How to Photograph Snow Without It Looking Grey
Tips for Photographing Snow with Shutter+
Why does snow always look grey in photos — and how to fix it fast
Snow photography is one of the most rewarding and most frustrating challenges in outdoor photography. A clean white landscape can look stunning, but without the right camera settings, your images will come out flat, underexposed, or completely blown out. In this guide, we’ll walk through the exact techniques that produce great snow photos — and show how Shutter+ makes each one dramatically faster and easier than wrestling with your camera’s built-in menus in freezing cold weather.
Why Is Snow Photography So Difficult?
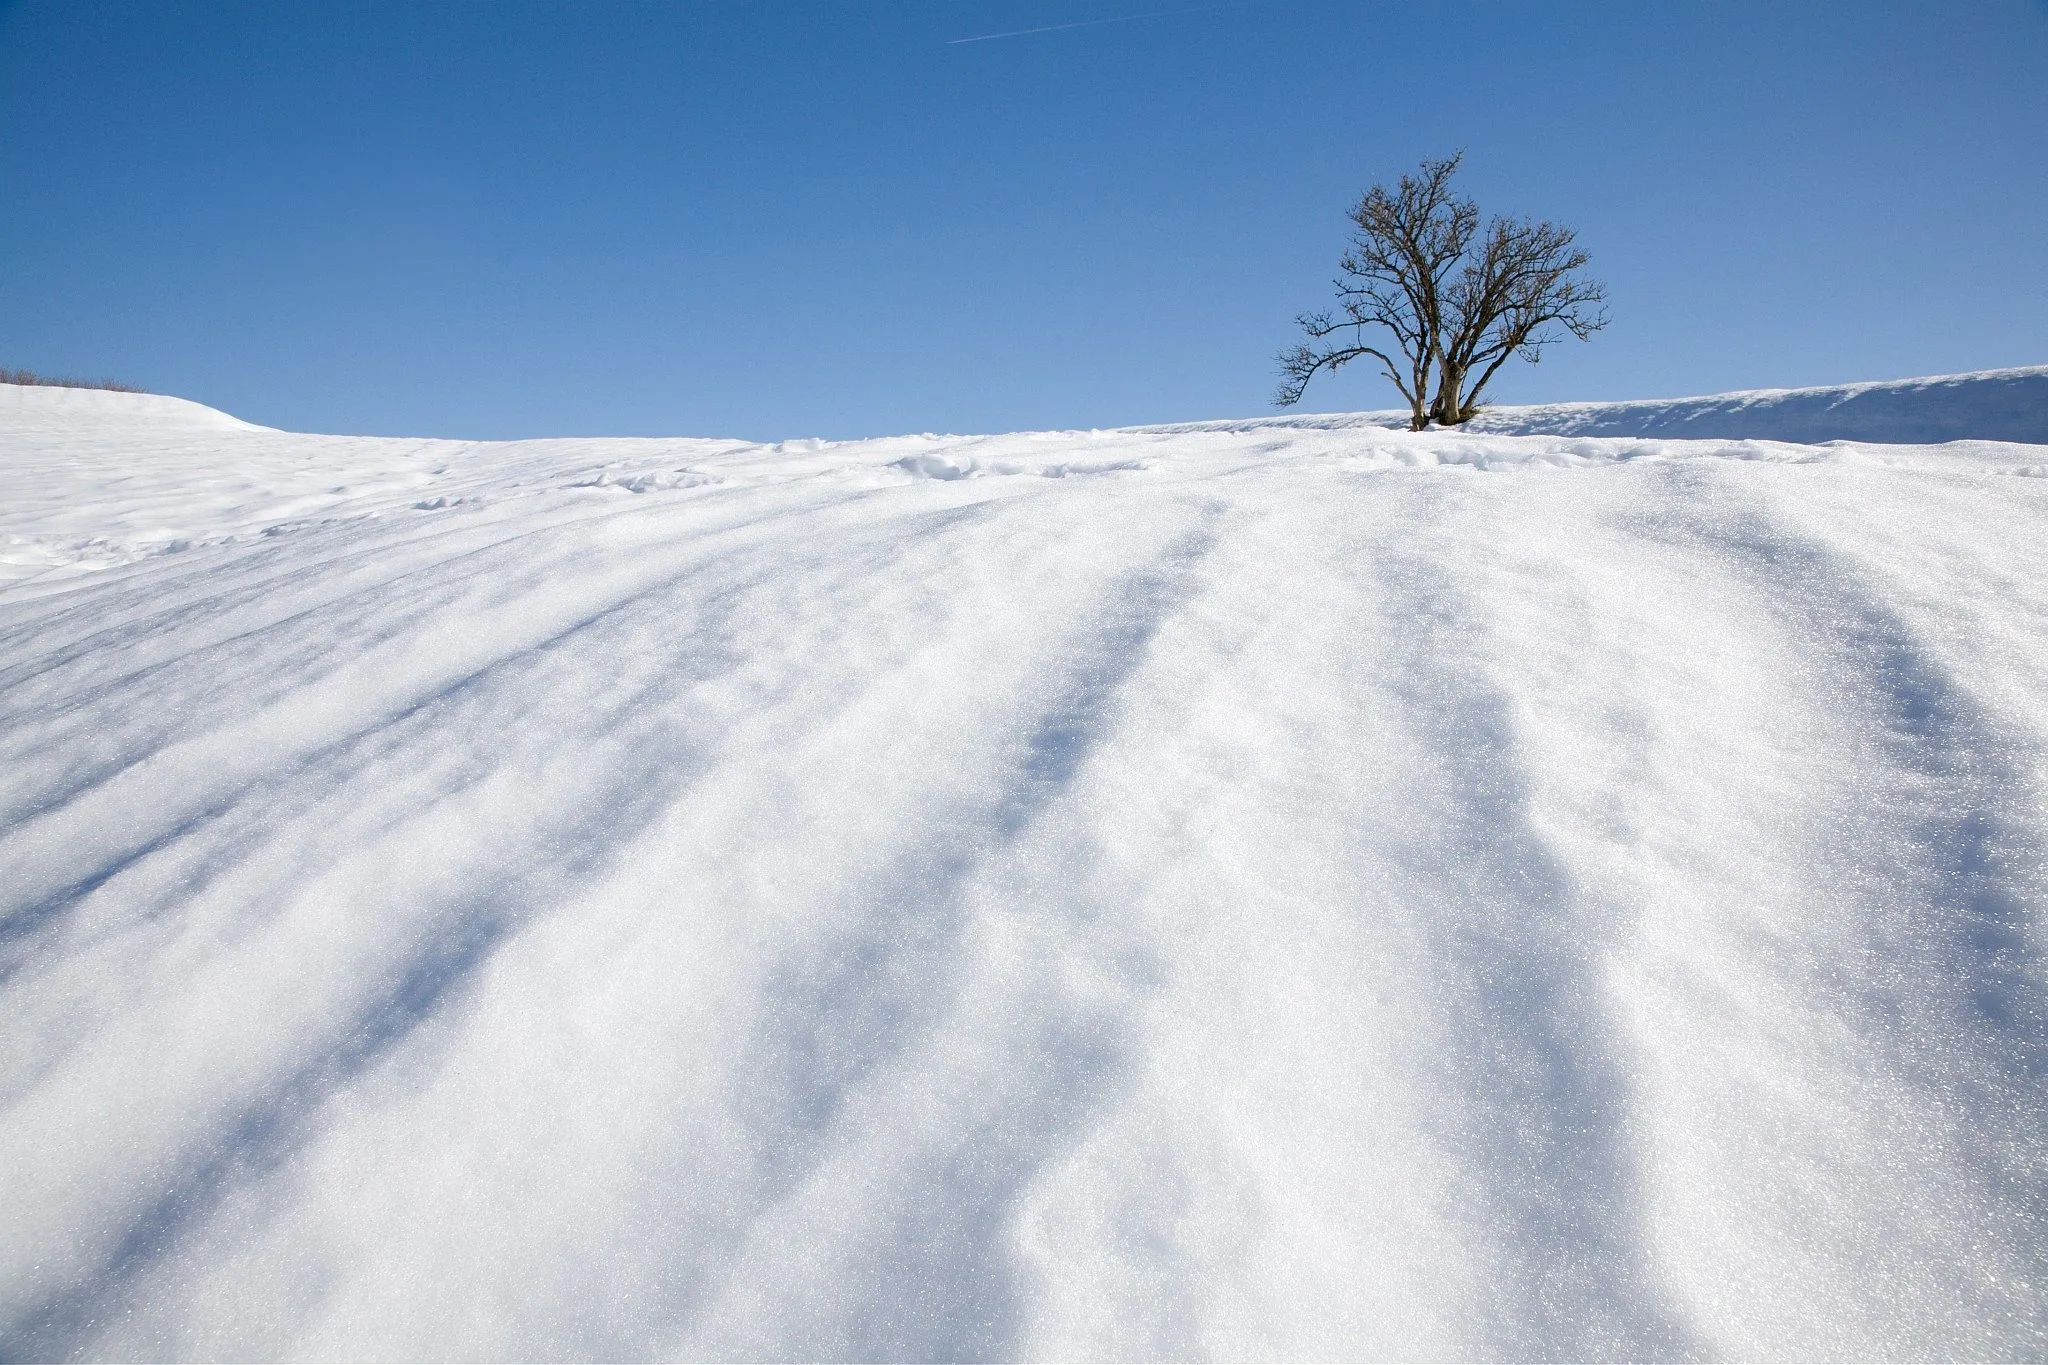
Your camera’s light metering system is calibrated to expose for a theoretical “average” scene — one that reflects roughly 18% of the light hitting it (known as 18% grey). Snow reflects around 90% of available light. The result? Your camera consistently underexposes snowy scenes, rendering brilliant white snow as a dull, muddy grey.
This is the single most common reason snow photographs disappoint, and it affects every camera — Sony, Canon, Fujifilm, and beyond. The fix is surprisingly simple once you know it, and Shutter+ makes applying it faster than ever.
Tip 1: Set Exposure Compensation Instantly — Without Touching Your Camera
Why Exposure Compensation Is the Key to Great Snow Photos
To counteract your camera’s tendency to underexpose bright white scenes, you need to dial in positive exposure compensation — typically between +1 and +2 stops, depending on conditions. This tells the camera: “This scene is brighter than average. Expose accordingly.”
The challenge is doing this quickly and accurately in the field, especially with gloves on or when the light is changing fast.
How Shutter+ Makes It Effortless
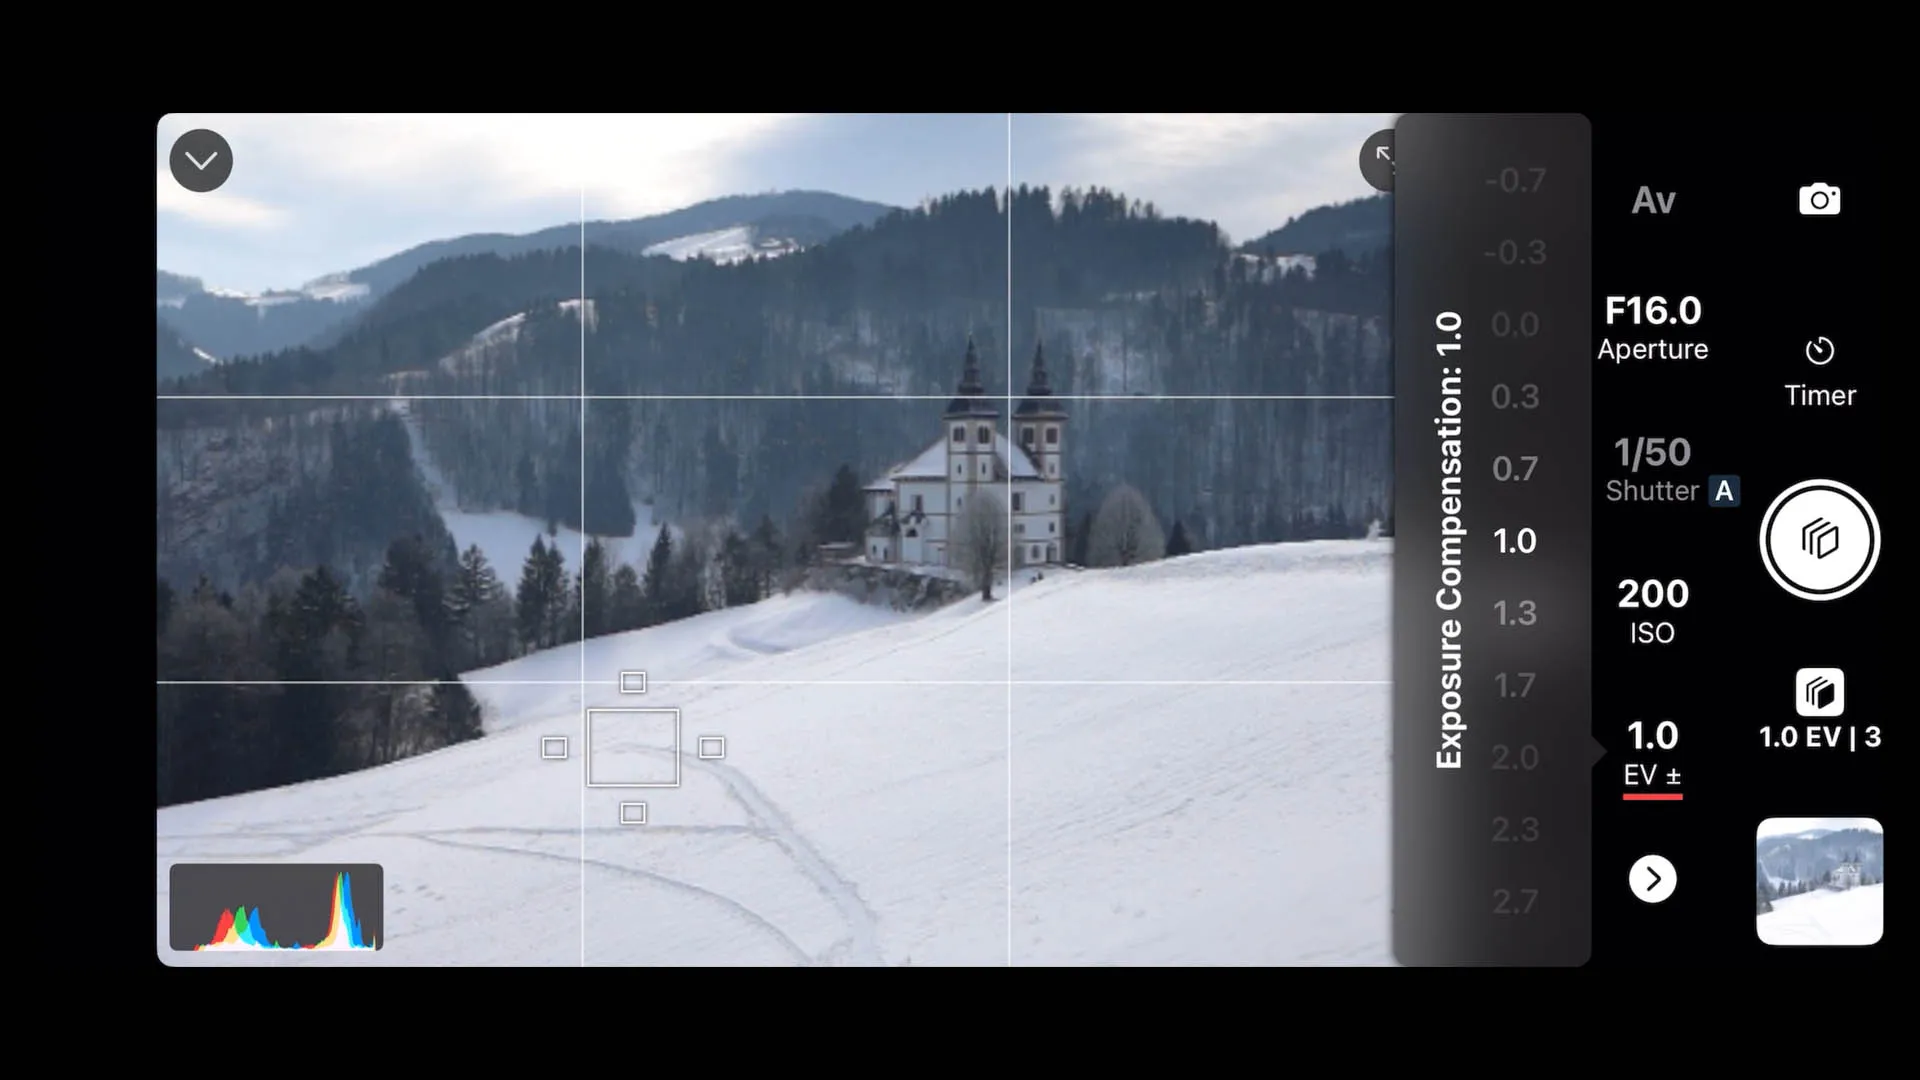
On most cameras, adjusting exposure compensation requires navigating physical dials, button combinations, or nested menus — awkward at the best of times, maddening in freezing temperatures. With Shutter+, exposure compensation is a single, prominent control on your iPhone or iPad screen, adjustable in seconds.
Change it once, and the result is immediately visible in the live view preview on your device — no guessing, no test shots, no chimping through your camera’s rear screen. What you see on your phone is exactly what you’ll capture.
Why Your iPhone or iPad Screen Beats Your Camera’s Display in Snow
In bright winter conditions, your camera’s rear LCD is almost impossible to read outdoors. Glare and reflections make it effectively useless for judging exposure accuracy.
Your iPhone or iPad screen, by contrast, is engineered for real-world outdoor use — with significantly better brightness and contrast in direct sunlight.
Pro tip for extreme conditions: In very bright snow, drape your coat or jacket over yourself and your device to completely shield the screen from the light. This gives you an accurate, glare-free preview of your exposure. Crucially, this is far safer to do with your phone than with your camera — a camera covered in a coat can be easily knocked, moved, or have its focus accidentally shifted. Your iPhone stays safely in your hand where you’re in full control.
Bonus: Use Shutter+ from Your Apple Watch
Shutter+ also runs on Apple Watch, letting you adjust exposure settings and trigger the shutter directly from your wrist — ideal when your hands are buried in gloves and you don’t want to pull out your phone. It’s one of the most practical features for cold-weather photography, especially when your camera is on a tripod.
Tip 2: Use Zebra Stripes to Spot Blown Snow Highlights in Real Time
What Are Zebra Stripes?
Zebra stripes are a live view overlay that marks over- or under-exposed areas of your frame with an animated striped pattern — directly on the image, in real time. They’re borrowed from professional video cameras and are one of the most useful tools for snow photography.
Why Zebra Stripes Are Perfect for Snow
Snow is a natural highlight trap. Small changes in exposure — a cloud clearing, sunlight shifting — can tip your snow from beautifully textured white to completely blown out with no recoverable detail. Zebra stripes catch this the moment it happens, before you take the shot.
In Shutter+, you can adjust the brightness threshold for the stripes, so you can set them to trigger precisely at the level where your snow starts to lose detail — giving you a precise, visual early warning system.
Tip 3: Use the Histogram to Nail ETTR (Expose to the Right) for Snow
What Is the Histogram and Why Does It Matter?
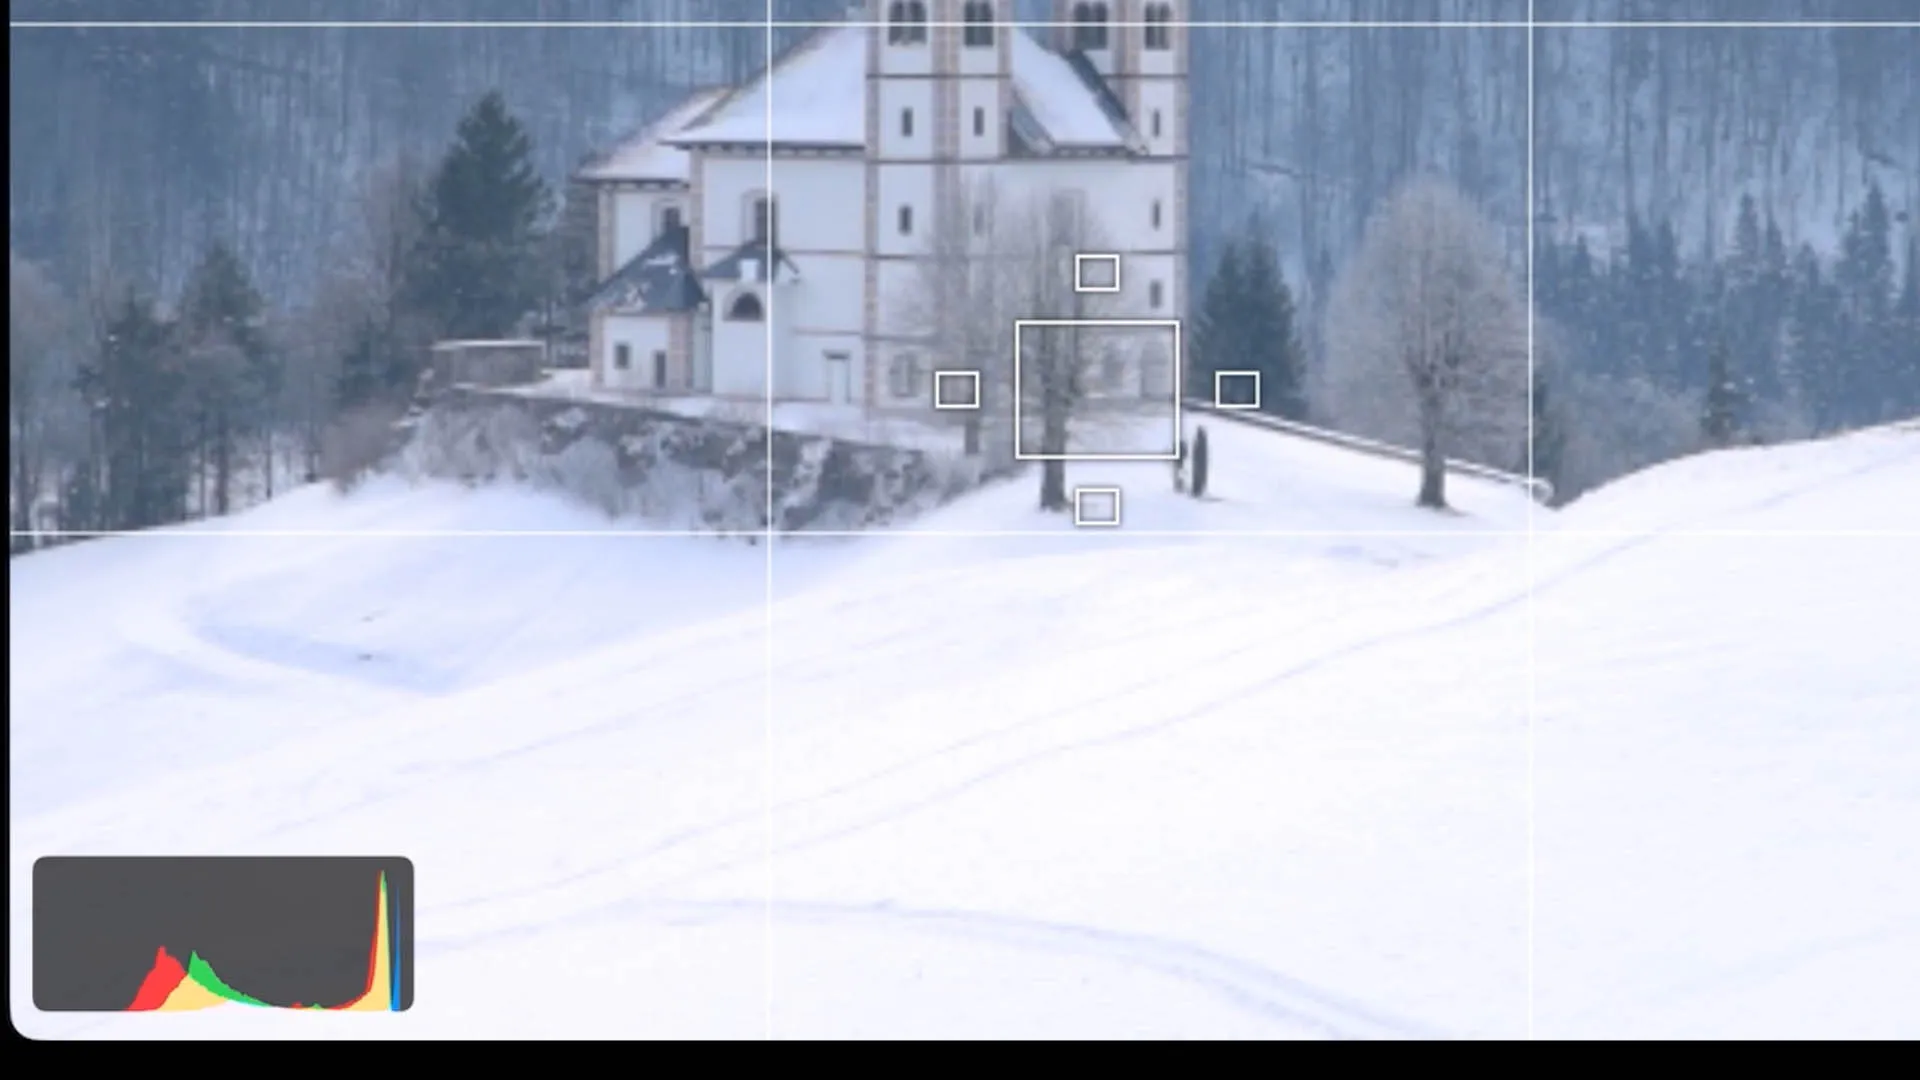
The histogram is a graph showing the distribution of tones in your image, from pure black on the left to pure white on the right. It is the most reliable exposure tool available to any photographer — far more accurate than your screen, which varies depending on ambient light and viewing angle.
For snow photography, the histogram does two critical jobs:
-
It tells you if your highlights are clipping. If the graph is jammed hard against the right edge, you’ve lost detail in your snow highlights — they’ll appear as pure, featureless white with no texture. This is often impossible to recover, even from RAW files.
-
It helps you execute ETTR (Expose to the Right) technique. ETTR means deliberately pushing your exposure as far right as possible without clipping the highlights. This maximises the tonal data captured in your RAW file, producing cleaner, more detailed images with significantly less noise — especially valuable in flat winter light or blue-hour snow scenes.
Using the Histogram in Shutter+
Shutter+‘s real-time histogram is always available in the shooting interface alongside your live view. You can monitor it continuously as you adjust exposure, and see instantly whether your snow is retaining detail or beginning to clip — making precise corrections using the exposure controls, without ever touching the camera.
The combination of live histogram + instantly adjustable exposure compensation creates a feedback loop that simply isn’t available when working from a camera’s rear screen — and it lets you apply ETTR technique accurately and confidently, even in rapidly changing light.
Tip 4: Use Exposure Bracketing for High-Contrast Scenes and Highlight Protection
When Snow Photography Needs Extra Insurance
Some snowy scenes present an extreme dynamic range — bright sunlit snow alongside deep shadows, or a clear blue sky above a reflective white foreground. In these situations, a single exposure will either clip the snow highlights or lose shadow detail. There’s no single “correct” exposure that holds both ends.
This is where exposure bracketing becomes essential.
What Is Exposure Bracketing?
Exposure bracketing means capturing multiple shots of the same scene at different exposure values — for example, one at the metered exposure, one stop under, and one stop over. Together, these frames contain all the tonal information in the scene.
How Shutter+‘s Exposure Bracketing Feature Works
Shutter+‘s built-in exposure bracketing lets you configure and shoot a complete bracket sequence with minimal fuss. You can set the number of brackets, the EV step size between them, and choose whether to vary shutter speed, ISO, or exposure compensation. There are three compelling reasons to use it for snow photography:
-
Exposure blending in post-processing. If you shoot RAW and use editing software such as Lightroom, Photoshop, or Capture One, you can blend the best-exposed parts of each frame into a single, balanced final image — snow retaining texture, shadows retaining detail.
-
HDR capture for dramatic winter landscapes. Bracketed exposures are the foundation of HDR photography — particularly effective for high-contrast winter scenes with bright skies and deep snow shadows.
-
An insurance policy against blown highlights. Even if you only plan to use a single shot, having a bracketed sequence means there’s always a slightly underexposed frame to fall back on if the main exposure has clipped the snow. In snow photography, burned-out highlights are notoriously difficult — often impossible — to recover, even from RAW. A bracket costs you almost nothing; losing the shot costs you the image.
Tip 5: Review Every Shot on a Proper Screen — Then Share Straight to Social
See Your Snow Photos as They Deserve to Be Seen
Your camera’s rear LCD screen is small, often glary in winter light, and simply not large enough to judge whether your snow shot truly worked — whether the texture in the snowfield is preserved, whether the shadows hold detail, or whether that fast-moving subject is sharp. After a shoot in the cold, the last thing you want is to get home and discover a problem you could have caught and corrected on location.
With Shutter+, you can browse and download your photos directly from the camera’s memory card to your iPhone or iPad — giving you a much larger, clearer screen to review your images the moment they’re taken. Zoom in to check that the snow texture is crisp, that your focus landed exactly where you intended, and that your exposure has held the highlight detail you worked to protect. The difference between a 3-inch camera screen and a 6-inch iPhone display in good colour and sharpness is genuinely significant.
Find the Right Shot Fast
After a bracketed sequence or a burst on a snowy landscape, you can end up with dozens of frames to sift through. Shutter+‘s photo browsing lets you filter images by date, star rating, or file format — so you can jump straight to the shots you care about without scrolling through hundreds of thumbnails. On cameras with dual card slots, you can switch between cards instantly without touching the camera.
Download and Share to Social Media on the Spot
If you’ve captured something special — a perfectly lit snowscape, a first snowfall moment, a shot you’re proud of — you don’t have to wait until you’re back at your desk to share it. Shutter+ lets you download JPEG files directly to your iPhone’s camera roll, ready to share to Instagram, share in a message, or post wherever you like, right there in the field.
Shoot in both RAW and JPEG simultaneously on your camera, and you’ll always have the JPEG for immediate social sharing and the RAW for careful post-processing later — the best of both worlds.
Tip 6: No Signal? No Problem — Shutter+ Works Completely Off-Grid
Winter landscapes often mean remote locations — mountains, moorland, forests far from Wi-Fi. Shutter+ connects to your camera via Wi-Fi Direct, meaning the camera creates its own private network. No internet connection, no home router, no mobile signal required. You can use Shutter+ in the most isolated winter locations without losing any functionality.
For an even more reliable connection in harsh conditions, you can connect via USB cable — useful when cold or moisture might affect wireless performance.
Additional Snow Photography Tips
Check your white balance. Snow can take on a strong blue cast in open shade, or shift warm and golden at sunrise. Use the white balance control in Shutter+ to fine-tune this in real time, or shoot RAW and adjust in post.
Shoot RAW format. Snow leaves little margin for exposure error. RAW files give you significantly more latitude to recover highlights, adjust white balance, and reduce noise compared to JPEGs.
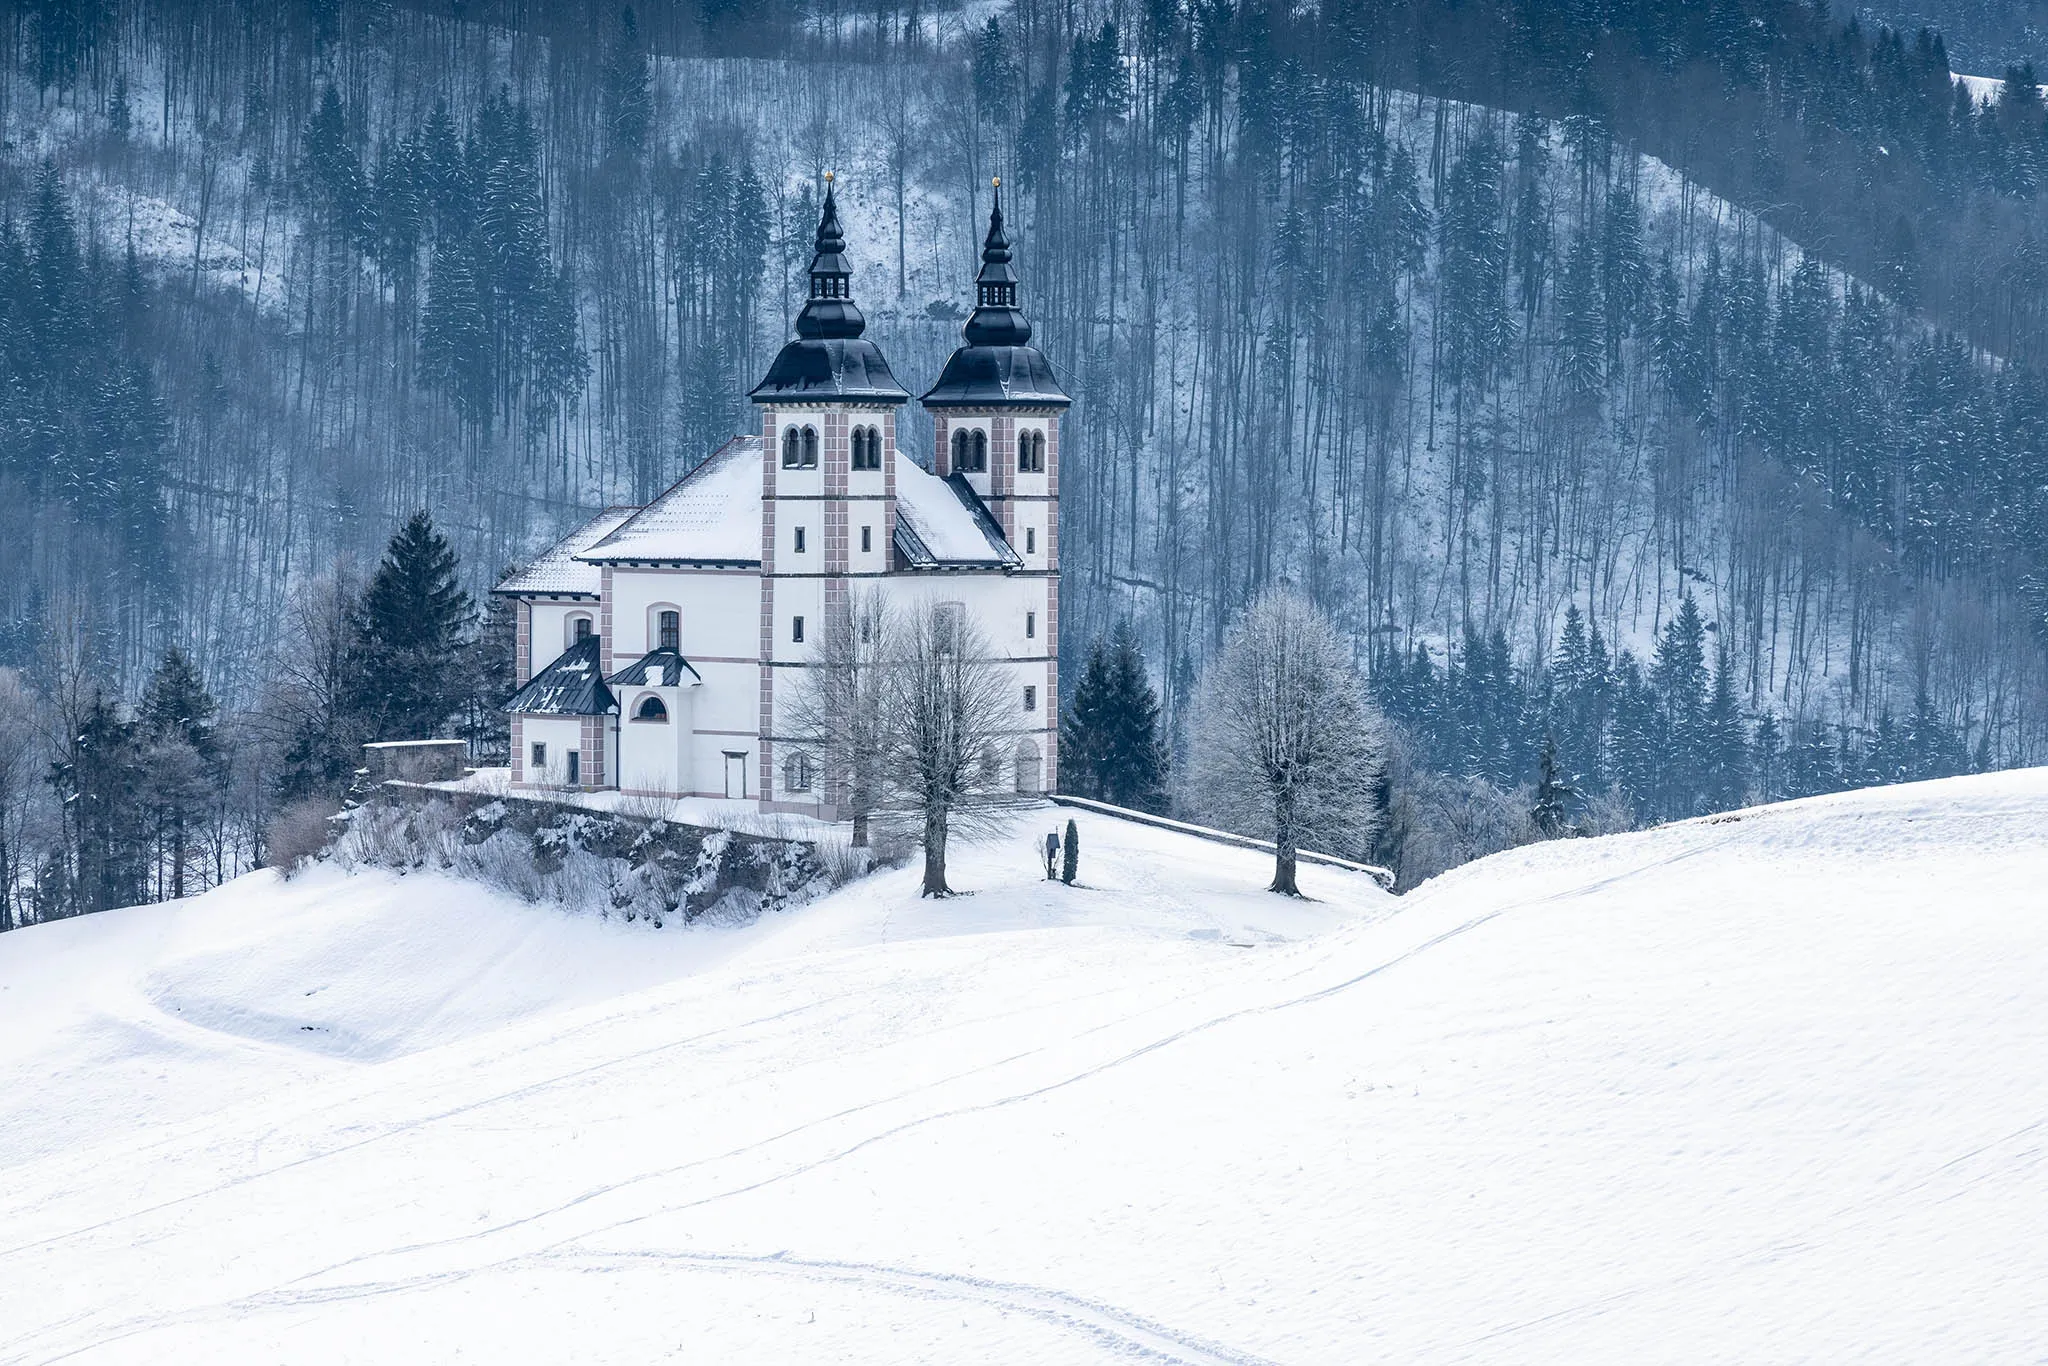
Look for contrast and colour. The most compelling snow photographs often include a strong focal point — a red door, a dark tree line, a figure in a brightly coloured jacket — to contrast with the white landscape. Shutter+‘s live view makes it easy to evaluate your composition on a larger screen before committing.
Shoot in the golden hours. Low winter sun casts long shadows across snow, adding texture, depth, and warmth that flat midday light cannot provide. The short winter day means golden hour arrives early and leaves fast — Shutter+‘s remote live view lets you monitor your composition from a distance while the light does its work.
Frequently Asked Questions About Snow Photography
Why does snow look grey in my photos?
Your camera’s metering system exposes for an average mid-tone scene. Snow is much brighter than average, so the camera underexposes it — rendering white snow as grey. The fix is positive exposure compensation, typically +1 to +2 stops, to tell the camera the scene is brighter than it assumes. In Shutter+, this is a single tap on your iPhone or iPad screen.
How much exposure compensation should I use for snow?
Start at +1 stop and check your histogram. For very bright sunlit snow under a clear sky, you may need +1.5 to +2 stops. Use Shutter+‘s live histogram to verify that your highlights aren’t clipping before you shoot.
What is ETTR and how does it help with snow photography?
ETTR (Expose to the Right) means setting your exposure so the histogram sits as far right as possible without clipping the highlights. This maximises the data captured in your RAW file, giving you cleaner, more detailed snow tones with less noise — and more flexibility in post-processing.
Should I use exposure bracketing for snow photography?
Yes — especially in high-contrast scenes such as sunlit snow with shadowed trees, or a white foreground under a deep blue sky. Bracketing gives you frames to blend in post, and acts as insurance against accidentally clipping the snow highlights in your main shot. Shutter+‘s bracketing feature handles the sequence automatically.
How do I stop my camera screen from washing out in bright snow?
Your camera’s LCD is easily overwhelmed by reflected light from snow. Shutter+ lets you use your iPhone or iPad screen as a live viewfinder instead — which handles bright conditions far better. In extreme light, shield your device screen from glare by covering yourself with your coat for a completely accurate preview, without risking knocking your camera.
Can I download photos from my camera to my iPhone using Shutter+?
Yes. Shutter+ lets you browse your camera’s memory card and download photos directly to your iPhone or iPad — RAW or JPEG. You can filter by date, rating, or file format to find the shots you want quickly. JPEG files land straight in your camera roll, ready to share to social media immediately.
Does Shutter+ work without Wi-Fi or internet?
Yes. Shutter+ connects to your camera using Wi-Fi Direct — the camera creates its own network, with no router or internet connection required. It also supports USB connection for maximum reliability. You can use it in the most remote winter locations.
Which cameras does Shutter+ support?
Shutter+ supports Sony, Canon, and Fujifilm cameras. You can check whether your specific model is compatible on the Shutter+ cameras page.
Is Shutter+ available on Android?
No. Shutter+ is available exclusively on iOS — iPhone, iPad, and Apple Watch.
Can I shoot RAW with Shutter+?
Yes. Shutter+ supports RAW capture, giving you maximum flexibility in post-processing to recover highlights, adjust white balance, and reduce noise — all of which matter greatly in snow photography.
Start Getting Better Snow Photos Today
Snow photography rewards photographers who understand exposure — and punishes those who leave it to the camera. With Shutter+, the controls you need are always one tap away on your iPhone, iPad, or Apple Watch. The live view shows you exactly what your exposure will produce before you shoot, the real-time histogram keeps your highlights safe, and zebra stripes catch any clipping the moment it appears.
Whether you’re photographing a vast winter landscape, a snowy cityscape at dusk, or someone playing in fresh powder, Shutter+ puts you firmly in charge — from setting your exposure before the shot, to reviewing your images on a proper screen the moment they’re taken, to sharing your best frames to social media before you’ve even packed up the tripod.
Try Shutter+ free for 7 days — no commitment required.
Download Shutter+ on the App Store →
Related article: Exposure Bracketing: A Complete Guide