How to Photograph the Sunrise Over a Mountain Peak: Exposure Bracketing & Lens Flare Removal with Shutter+ & Photoshop
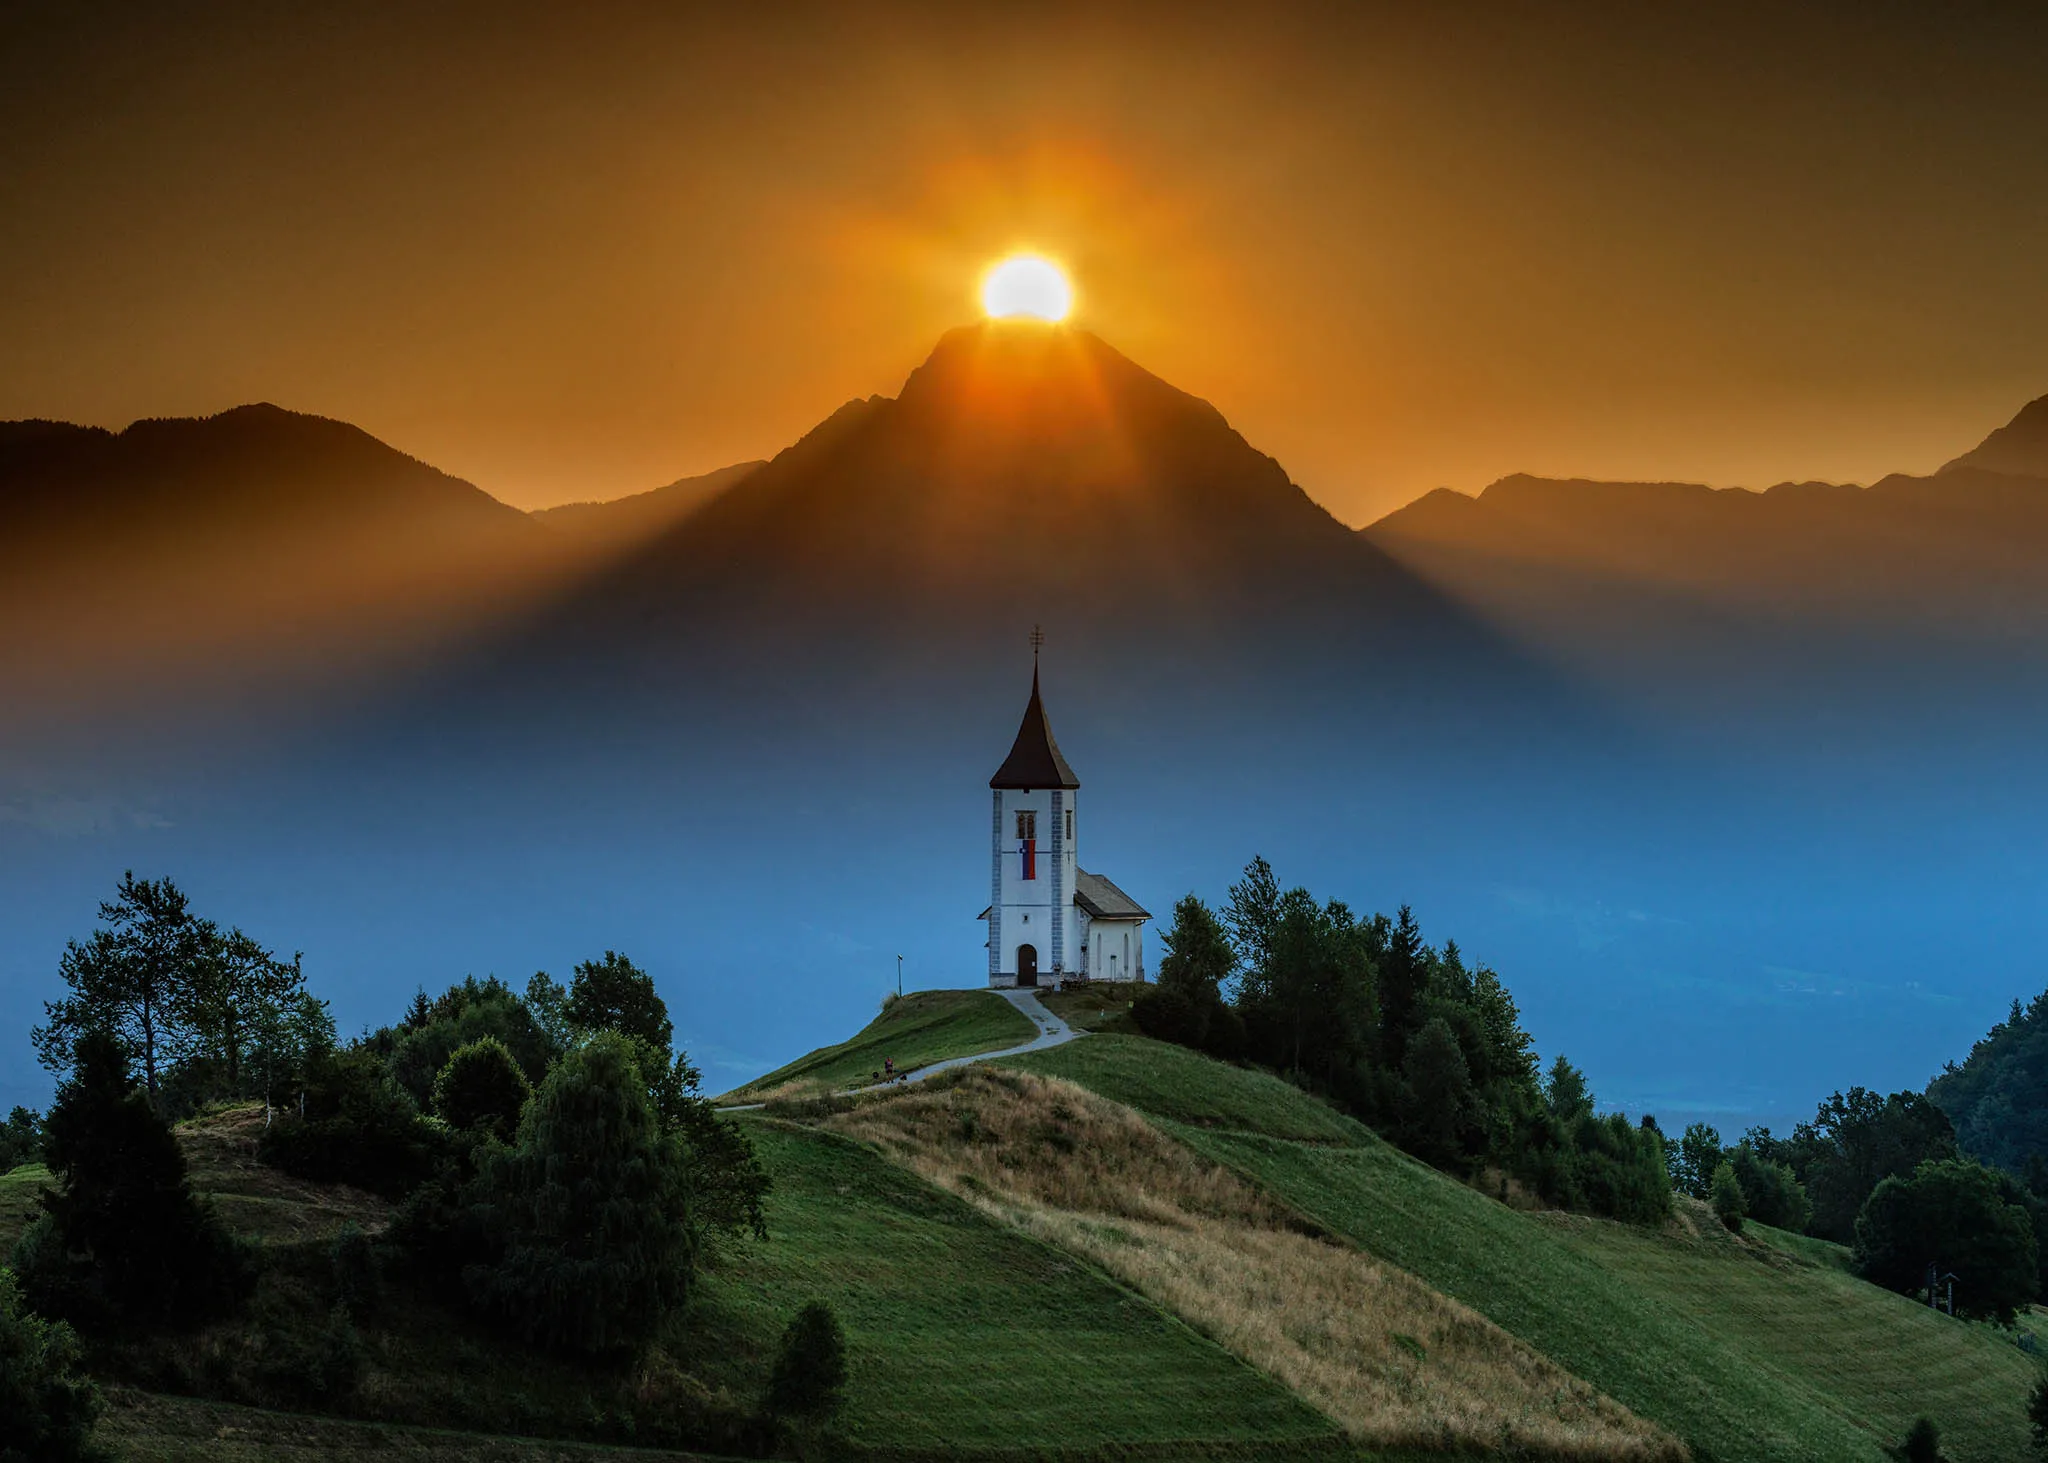
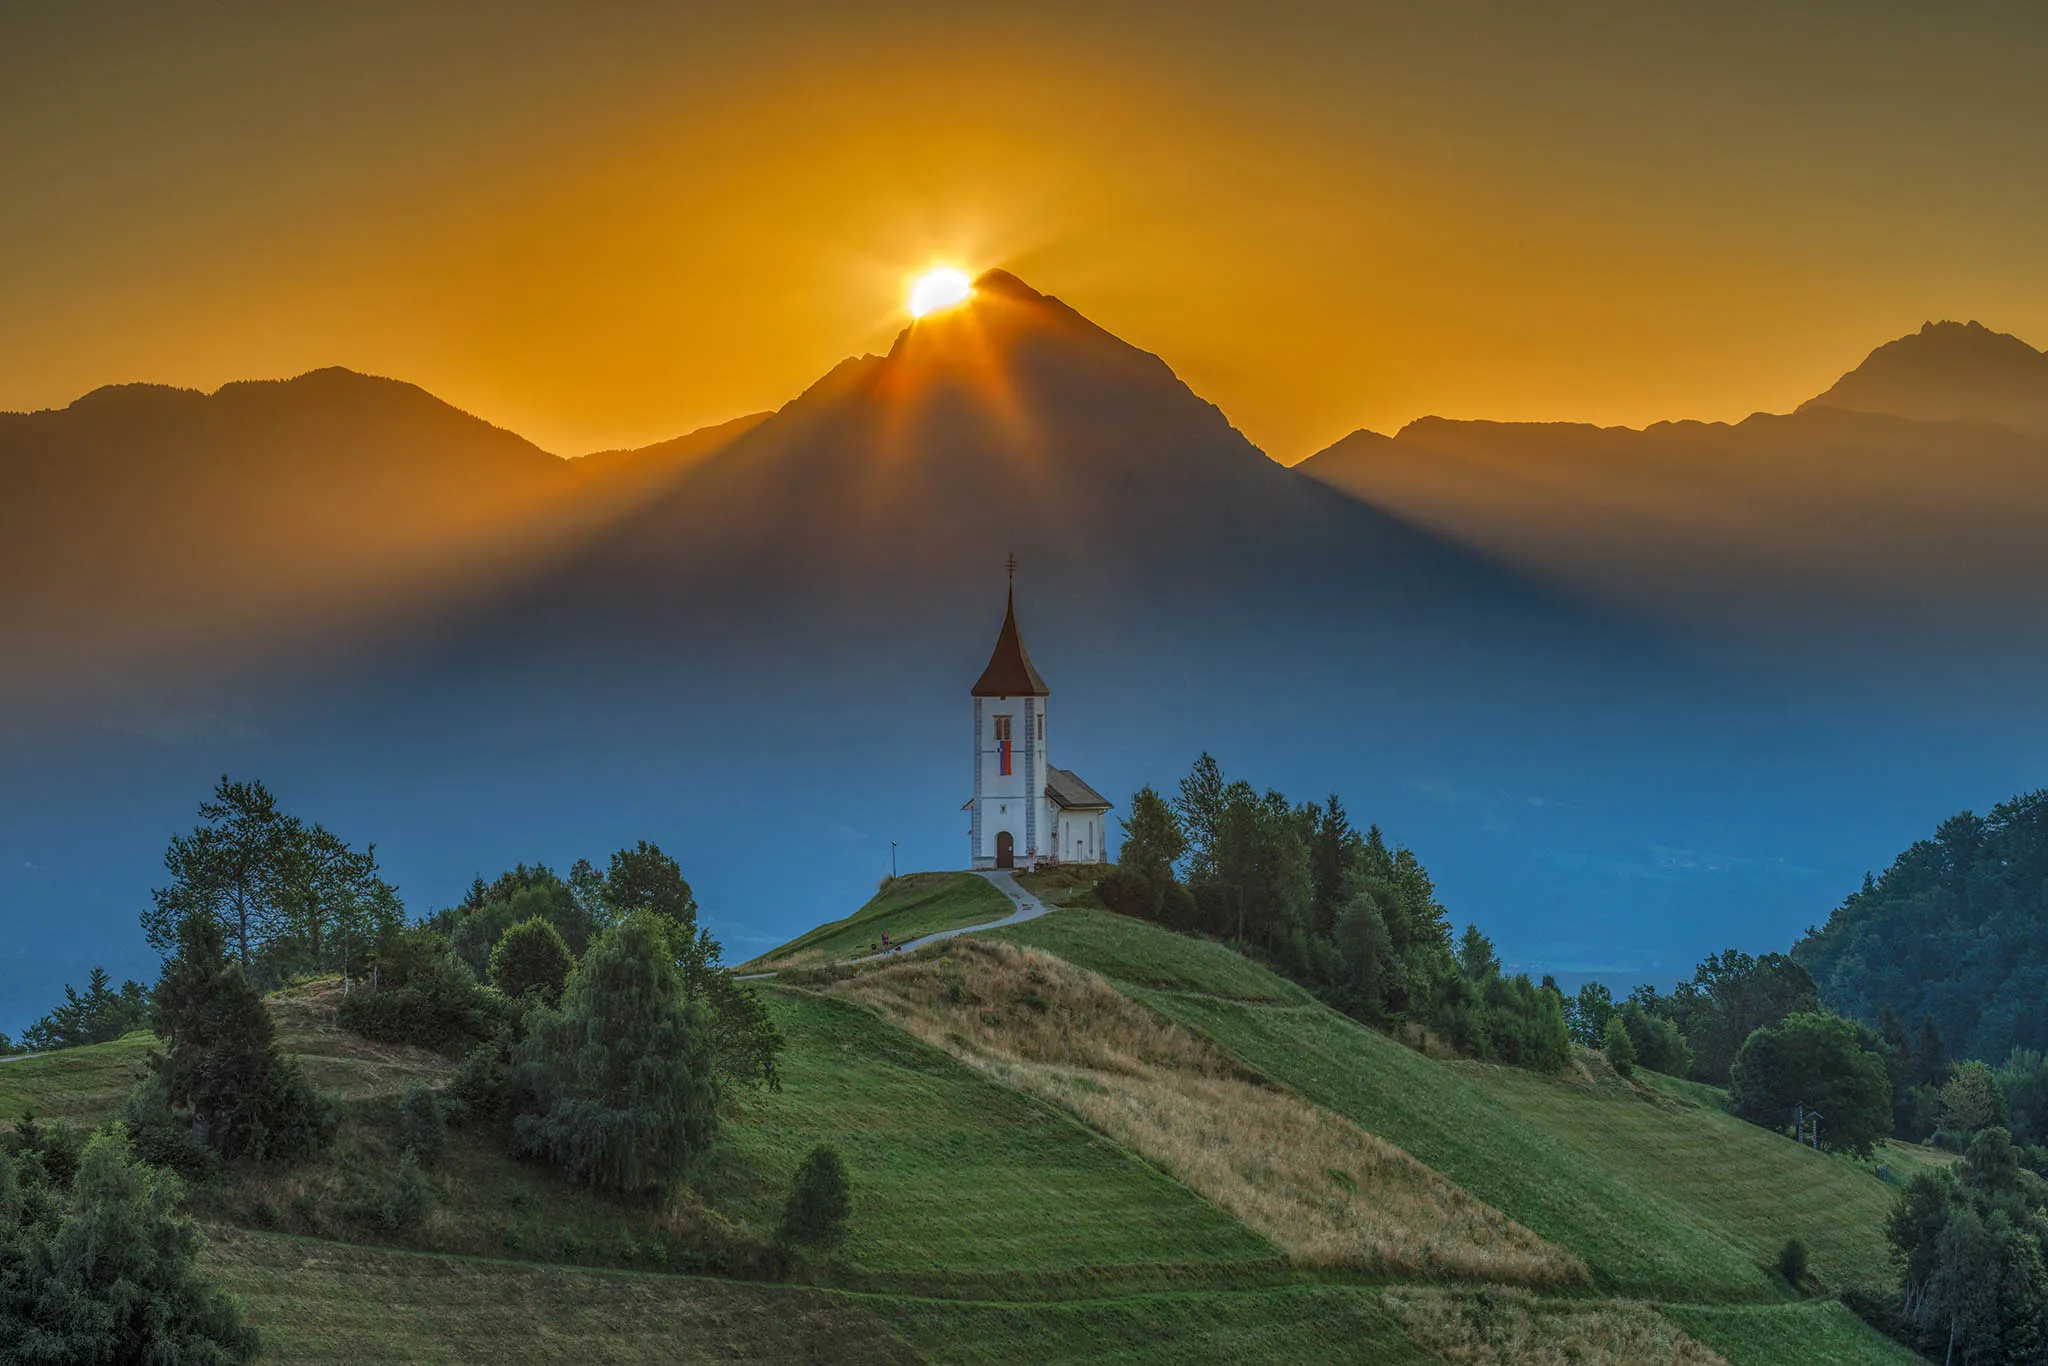
Shooting directly into a rising sun is one of the most rewarding — and technically demanding — challenges in landscape photography. The moment the sun crests a mountain peak and floods the scene with blinding light is fleeting, the contrast is extreme, and there is absolutely no room for camera shake or missed exposures. In this guide, photographer Ian Middleton walks through exactly how he tackled all of those problems to capture the magical sunrise over Mt. Storžič behind the historic Jamnik Church in Slovenia — using Shutter+ on iPhone to control his Canon EOS R5, and Adobe Photoshop to blend the results into a single, flare-free image.
Whether you’re asking “how do I photograph a sunrise without blowing out the sky?” or “how do I shoot into the sun without losing shadow detail?” — this guide has the answers.
In the following video guide, photographer Ian Middleton shows you how he uses Shutter+ to capture the magical moment when the sun rises over Mt. Storžič behind the historic Jamnik Church. He then guides you through blending the multiple exposures and easily removing unwanted lens flare for a professional result.
Watch the video below
The Problem: Shooting Directly Into the Sun
When the sun rises directly behind a mountain peak, your camera faces a scene with an extreme tonal range — easily 15–20 stops from the darkest shadows in the foreground to the brightest point of the sun itself. No single camera exposure can capture this in one shot. If you expose for the foreground, the sun and sky are completely blown out. Expose for the sun, and everything below the horizon becomes a black silhouette.
Beyond the exposure challenge, shooting into the sun introduces a second enemy: lens flare. Even the best lenses produce artefacts — ghosted circles, streaks, and colour casts — when pointed directly at a bright light source. These flares can ruin an otherwise perfect shot, and they change position and intensity as the sun moves, making them difficult to predict or avoid entirely.
Finally, there’s the logistical challenge: the window is tiny. The moment the sun is perfectly positioned behind the peak lasts only seconds. You need a system that lets you shoot continuously without touching the camera and without missing a single frame.
This is exactly the workflow that Shutter+ makes possible.
The Solution: Exposure Bracketing with a Remote Camera App
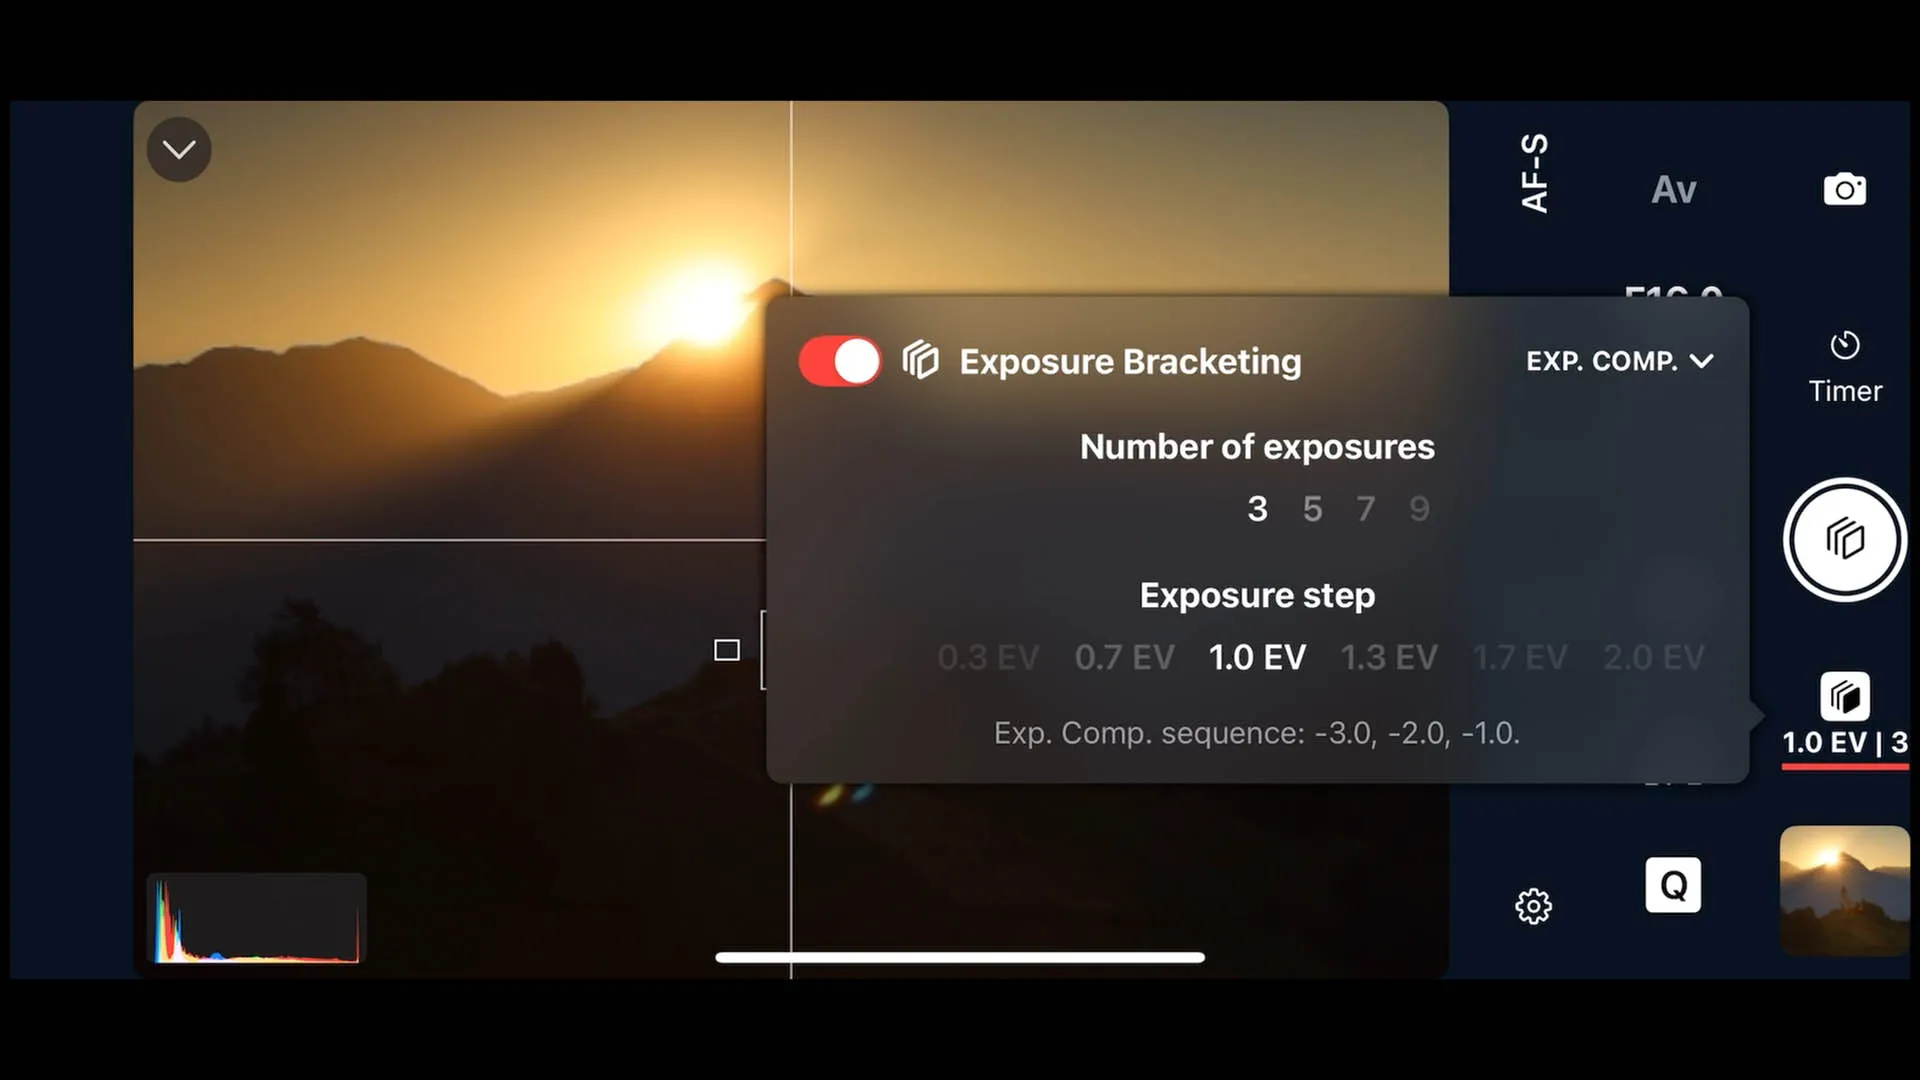
Exposure bracketing is the professional answer to high-contrast scenes. Instead of committing to a single exposure, you shoot a rapid sequence of frames at different exposure values (EVs) — typically three to five shots ranging from underexposed to overexposed. In post-processing, you select the best-exposed regions from each frame and blend them into a single image that represents the full dynamic range your eye could see on location.
The key requirement for blending to work cleanly is that all frames must be perfectly aligned. Even the slightest camera movement between shots makes blending difficult and creates ghosting artefacts at edges. This is why a remote camera controller isn’t just a convenience — it’s essential.
Equipment Used
• Canon EOS R5 Mirrorless Camera + Canon EF 100–400mm f/4.5–5.6L IS II USM Lens
• Benro 34CLV Tripod + Geared Head (essential for sharp, repeatable framing across bracketed sets)
• Shutter+ on iPhone 15 Pro Max — remote camera control, exposure bracketing, intervalometer, and grid overlay
• Adobe Photoshop CC — exposure blending and lens flare removal
How Shutter+ Solves Each Problem
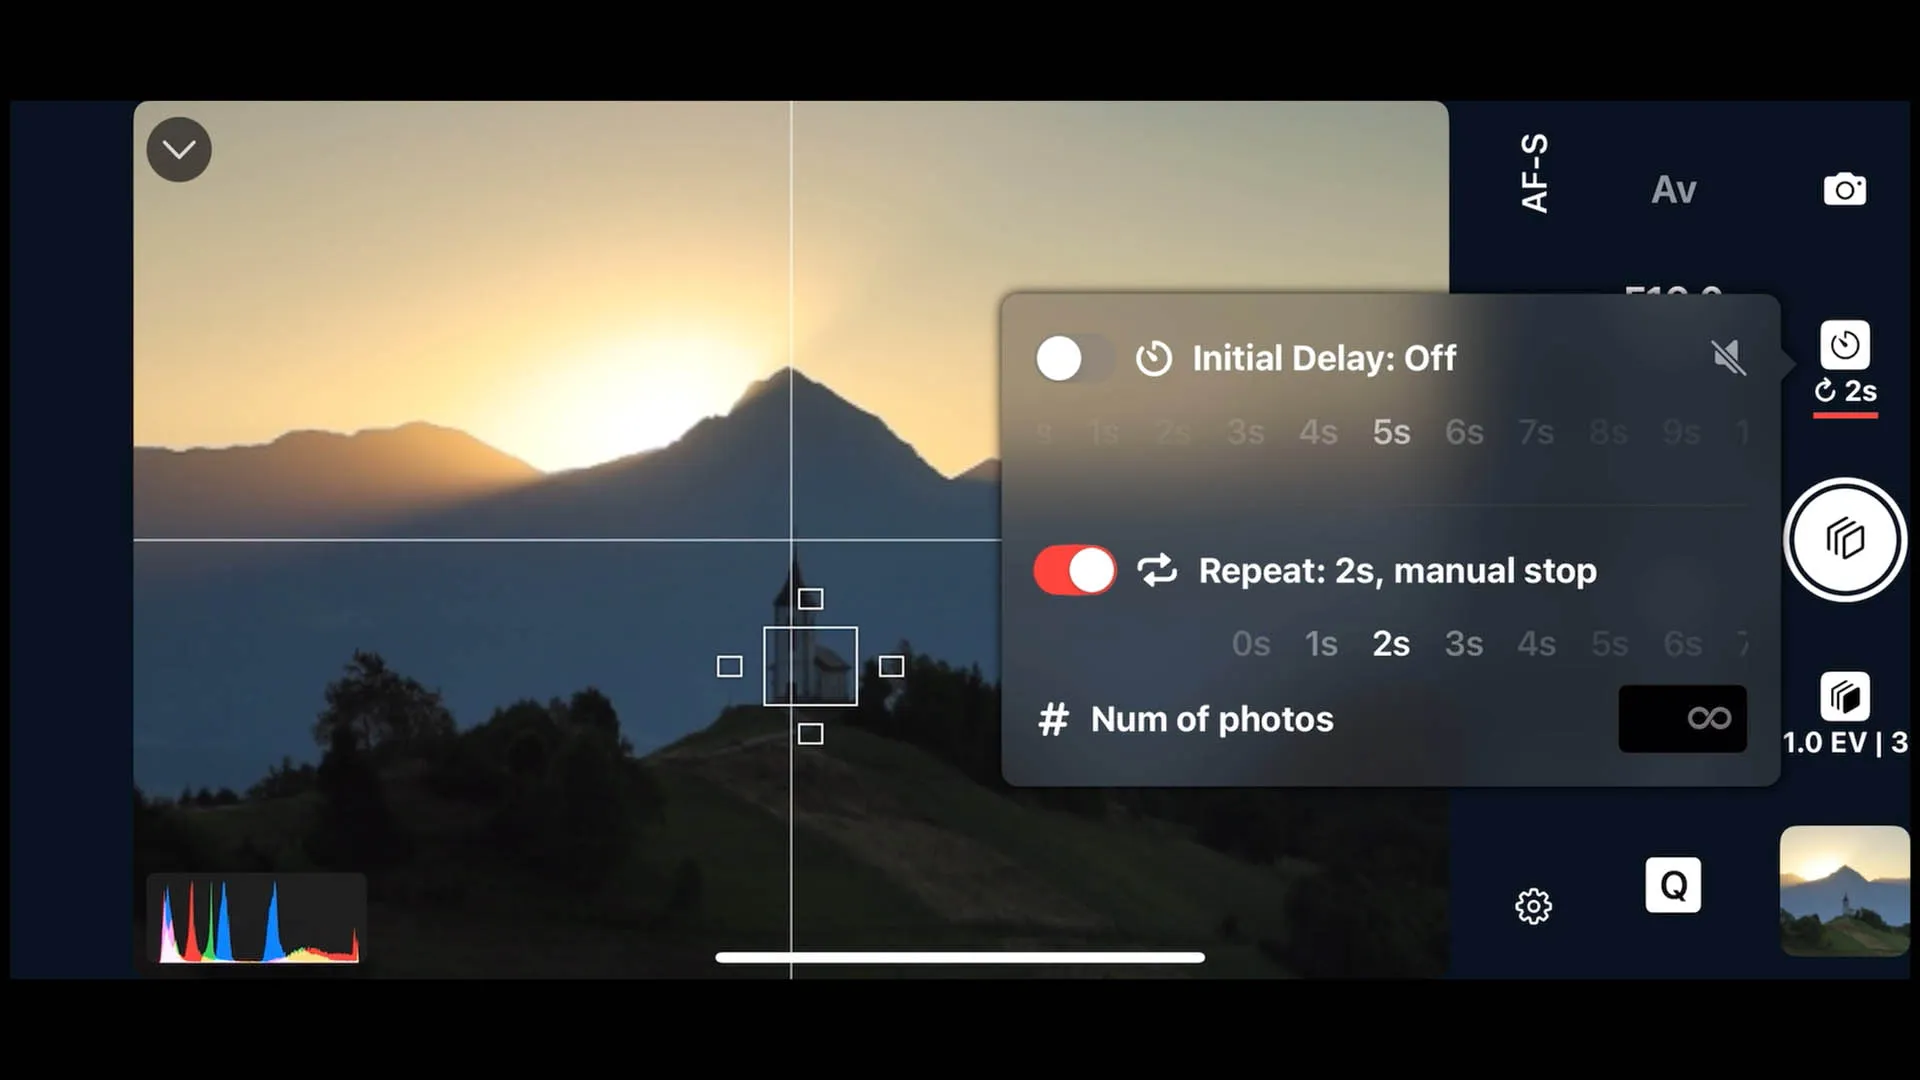
1. Grid Overlays: Nail Your Composition Before the Sun Arrives
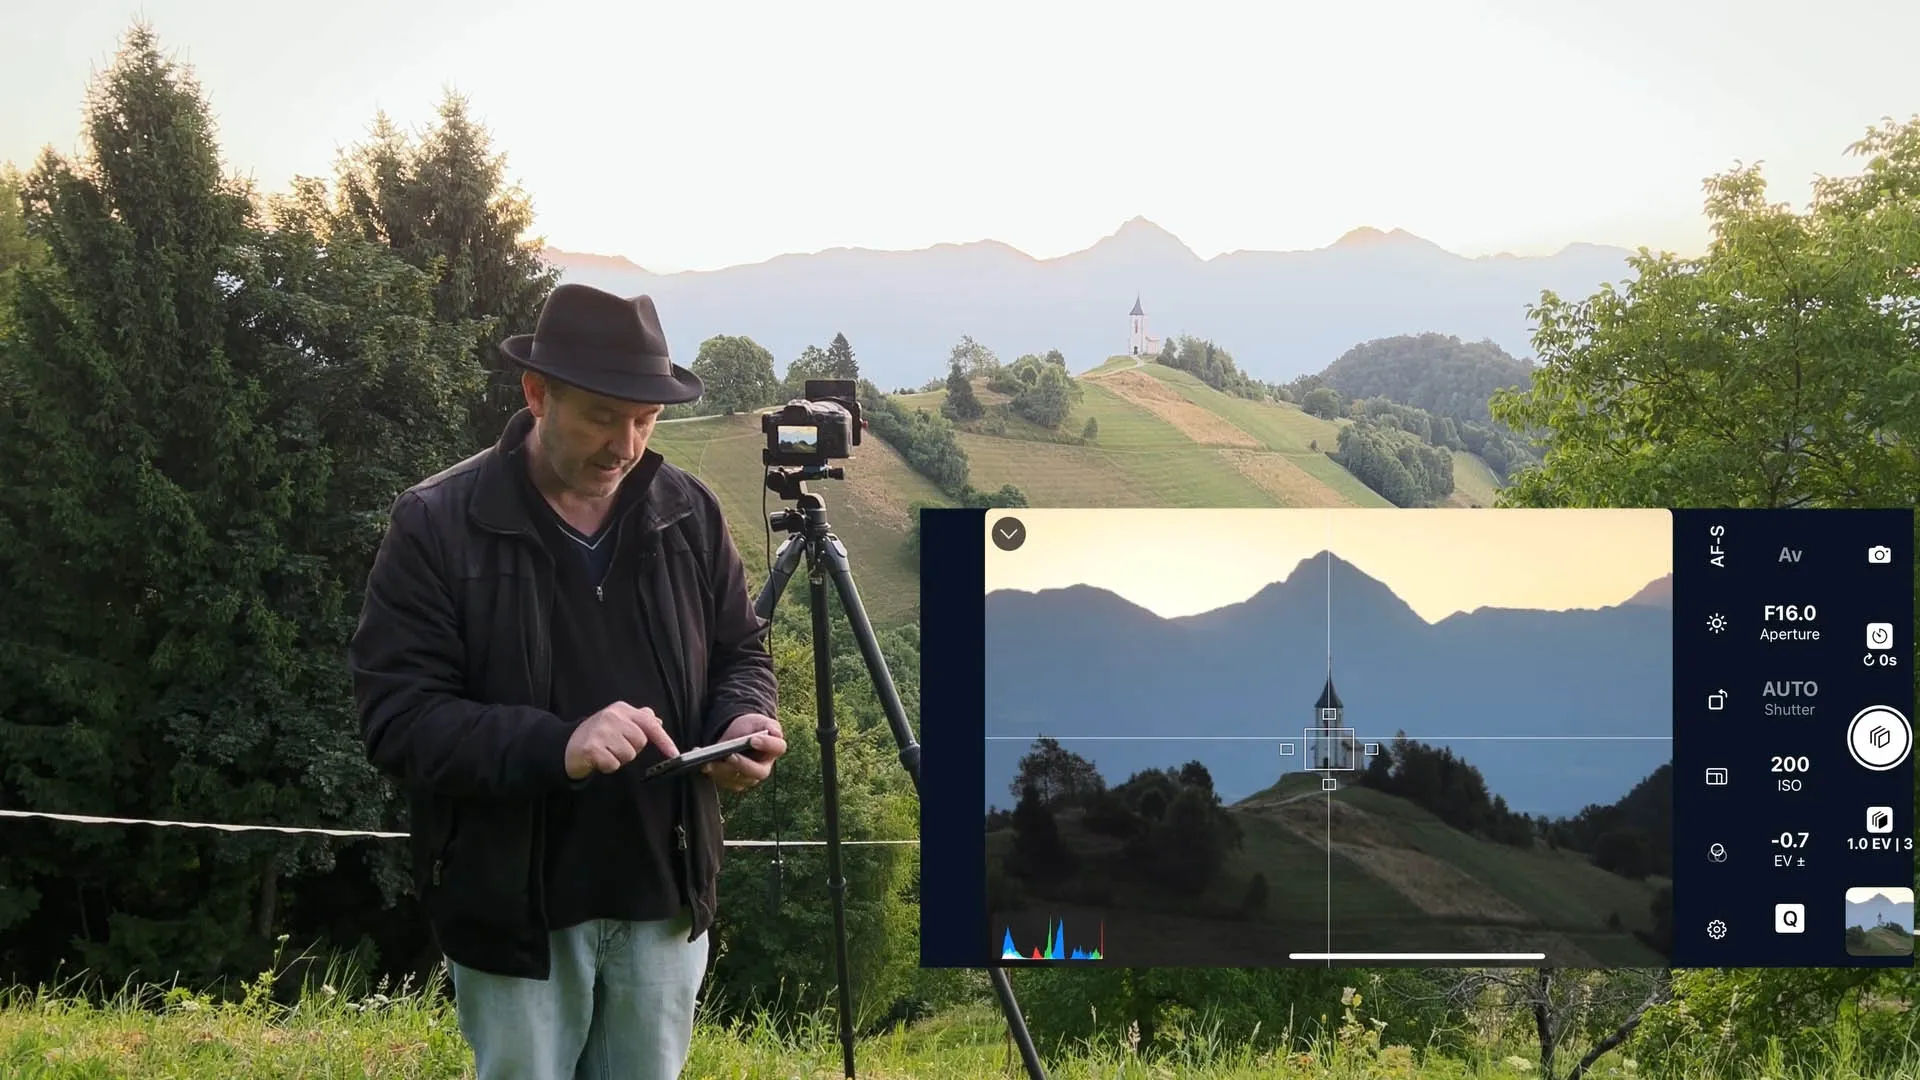
Composition decisions made in a hurry rarely hold up. With the sun still below the horizon, Ian used Shutter+’s live camera view — transmitted to his iPhone — to compose the shot carefully and lock it in before the action began.
Shutter+’s 2×2 grid overlay proved particularly valuable here. Most cameras start with a standard rule-of-thirds (3×3) grid, which splits the frame into nine equal cells. The 2×2 grid divides the frame into quadrants, with a single central crosshair at the exact geometric centre of the image. This allowed Ian to align both the church spire and the mountain peak along the same central vertical axis, placing them dead centre in the frame with precision that a 3×3 grid simply doesn’t offer. Something he couldn’t do in camera.
Getting this alignment right before sunrise meant no last-minute adjustments once the light began to change — a critical advantage when every second counts.
Why this matters for sun-over-peak shots: The sun rises quickly. Once it starts to clear the mountain top, you have very little time. Having your composition locked in advance means you are shooting, not fiddling.
2. Exposure Bracketing: Capturing the Full Dynamic Range
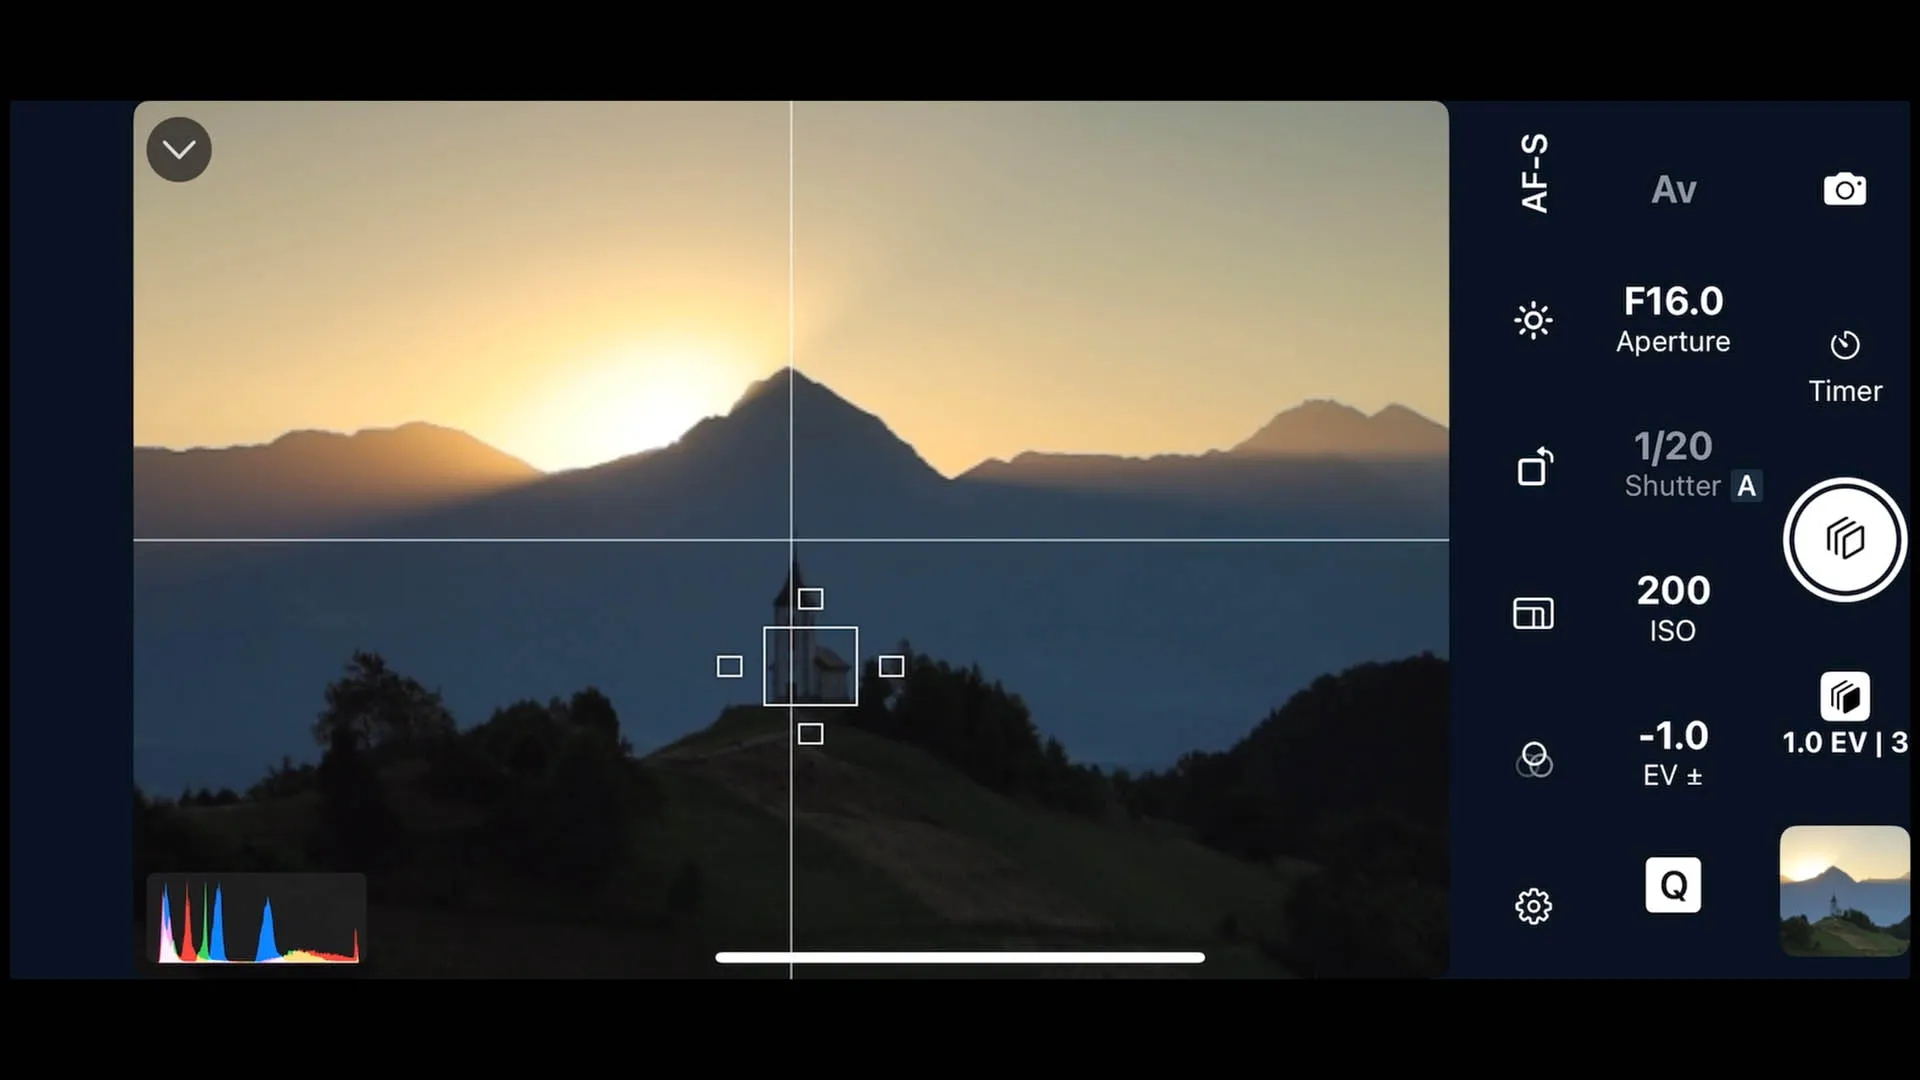
Once the composition was locked, Ian configured exposure bracketing directly from the Shutter+ app. With a long telephoto lens, any physical contact with the camera body — even the lightest touch of a dial — introduces vibration that takes seconds to settle. On a tripod, this is not just inconvenient; it means unusable frames at the critical moment.
Shutter+ lets you set and adjust your bracketing parameters entirely from your iPhone, without touching the camera. This means:
• No vibration introduced when changing settings as the sun gets higher and brighter
• Instant adjustments to the number of brackets, the EV spread, and the base exposure — all from your phone
• Consistent, repeatable bracket sets that align cleanly in post
For this shoot, Ian captured brackets across a wide enough EV range to expose for both the deepest shadows in the foreground and the blinding point of the sun itself. In Photoshop, these frames become the raw material for a composite image with natural-looking tonal depth across the full scene.
How many brackets do I need for a sunrise shot? For most high-contrast scenes, three to five exposures at 1–2 EV spacing covers the range. Scenes where you are shooting directly at the sun may benefit from five frames to ensure clean detail in both the deep shadows and the solar disc itself.
3. Intervalometer: Continuous Shooting as the Sun Moves
The sun does not stop for anyone. Once it begins to clear the mountain, its position and intensity change every few seconds — which means the ideal exposure changes too, and the opportunity for the perfect frame is constantly shifting.
Shutter+’s intervalometer allowed Ian to set the camera shooting automatically at a defined interval, capturing a continuous sequence of bracketed sets as the sun moved up the mountainside. This meant:
• No missed moments — the camera fired continuously without needing to be triggered manually
• A full sequence of frames to choose from in post, covering the entire event from the first glint of light to the full sunrise
• No camera contact at all during the shoot — every frame captured without the risk of shake
The combination of intervalometer and exposure bracketing is genuinely powerful. You’re not just capturing one bracketed set — you’re capturing dozens, at regular intervals, giving you complete creative choice in post about which moment and which blend tells the story best.
Post-Processing: Blending Exposures and Removing Lens Flare in Photoshop
Once back at the computer, Ian opens his selected bracket set in Adobe Photoshop and works through a blend-and-clean workflow.
Blending the Exposures
With the frames loaded as layers — typically with the best base exposure at the bottom and the darker brackets above it — the blending process uses luminosity masks or simple layer masks to select the best-exposed regions from each frame. The bright sky and solar detail come from the darkest bracket; the foreground detail and church come from the brighter frames. Because Shutter+’s remote control meant no camera contact between shots, the frames align perfectly and the blending edges are clean.
Removing Lens Flare
Lens flare is an almost unavoidable consequence of pointing a lens directly at the sun. Shutter+ cannot prevent it at the capture stage — no remote app can — but the workflow contains a built-in solution that makes removal far easier than most people expect.
The key trick: start shooting before the sun appears. Because Ian started shooting before the sun came up, he had a complete set of frames captured while the sun was still hidden behind the mountain — images with perfect foreground detail and absolutely no flare whatsoever. These pre-sunrise frames become an invaluable resource in Photoshop, providing clean source material to blend over the flare-affected areas in the later shots.
This is especially valuable in the foreground, where lens flare artefacts are the hardest to remove by hand. Cloning or patching over flare across complex textured areas — grass, rock, the church façade — risks looking unnatural and can take considerable time to do convincingly. Having a clean pre-sunrise frame of the same scene, perfectly aligned thanks to the tripod and remote control, means you can simply mask in the flare-free foreground sections directly, with no cloning required.
For any remaining artefacts where the light has changed too much between the pre-sunrise and post-sunrise frames to blend cleanly, Ian demonstrates how to finish the job with content-aware fill and clone stamp in Photoshop — a task made significantly easier by having multiple aligned source frames to borrow texture from.
The result is a set of composed images that looks exactly as the scene appeared to the human eye: a glowing mountain sunrise with a beautifully lit foreground, no blown highlights, and no distracting lens artefacts.
Key Takeaways
The single biggest challenge in shooting into the sun is dynamic range. No camera sensor can capture in one frame what the human eye sees in a high-contrast sunrise scene. Exposure bracketing is the solution — and Shutter+ makes it possible to set up, adjust, and trigger those brackets entirely from your phone, so the camera never needs to be touched once it’s on the tripod.
Composition precision is as important as exposure. The 2×2 grid in Shutter+ — a feature not found on most camera bodies — gave Ian a compositional reference that no standard camera grid provides, enabling the precise centre alignment of the church spire and the mountain peak.
Automation removes the human from the equation at the critical moment. The intervalometer meant the camera captured every frame of the sunrise automatically, without Ian needing to fire it manually. Combined with remote exposure control, this means the only variable left is the light itself.
Frequently Asked Questions
How do you photograph a sunrise without blowing out the sky?
Use exposure bracketing to capture multiple frames at different exposure levels, then blend them in Photoshop. A remote controller like Shutter+ lets you adjust your brackets without touching the camera, which is essential for keeping frames aligned.
How do you shoot into the sun without losing detail in the shadows?
No single exposure can hold both. Shoot three to five bracketed exposures, ensuring at least one frame exposes cleanly for the shadows and at least one holds detail in the solar disc. Blend the results in Photoshop using layer masks.
How do I remove lens flare in Photoshop?
Start by shooting before the sun appears so you have flare-free frames to blend in for the foreground — this is the cleanest and most convincing approach. For any remaining artefacts, use content-aware fill or clone stamp, borrowing texture from nearby clean areas or from earlier frames in your intervalometer sequence.
Why do I need a tripod for exposure bracketing?
The frames must be perfectly aligned for blending to work without ghosting. A stable tripod and a remote shutter trigger (rather than the camera’s built-in shutter button) are essential. A geared tripod head makes it easier to fine-tune framing precisely.
What is the best interval for photographing a sunrise?
For a rising sun over a mountain peak, an interval of 5–15 seconds captures enough frames to cover the full event without missing key moments. The exact interval depends on how quickly the light is changing.
Can I use Shutter+ with my Canon mirrorless camera?
Yes. Shutter+ supports a wide range of Canon EOS R-series and EOS DSLR bodies, including the EOS R5 used in this tutorial. Check the Shutter+ supported cameras list at shutter.dev/cameras for full compatibility.
Ready to try this workflow yourself? Download Shutter+ and explore the full User Guide at shutter.dev/user-guide/introduction to get started with exposure bracketing, intervalometer shooting, and grid overlays.