Focus stacking photography — 5 ways a remote control app helps
Why use a remote control app for focus stacking?
Focus stacking is one of the most effective techniques in landscape and macro photography for achieving front-to-back sharpness across a scene. The challenge is capturing multiple frames at slightly different focal points without any movement between shots — because even the slightest shift between frames can ruin the final composite. This is where a remote control app like Shutter+ becomes invaluable. By controlling your camera entirely from your phone or tablet, you eliminate the need to touch the camera at all, resulting in a perfectly stable set of frames that are far easier to blend in post-processing.
5 useful features for focus stacking
Use Shutter+‘s built-in focus bracketing
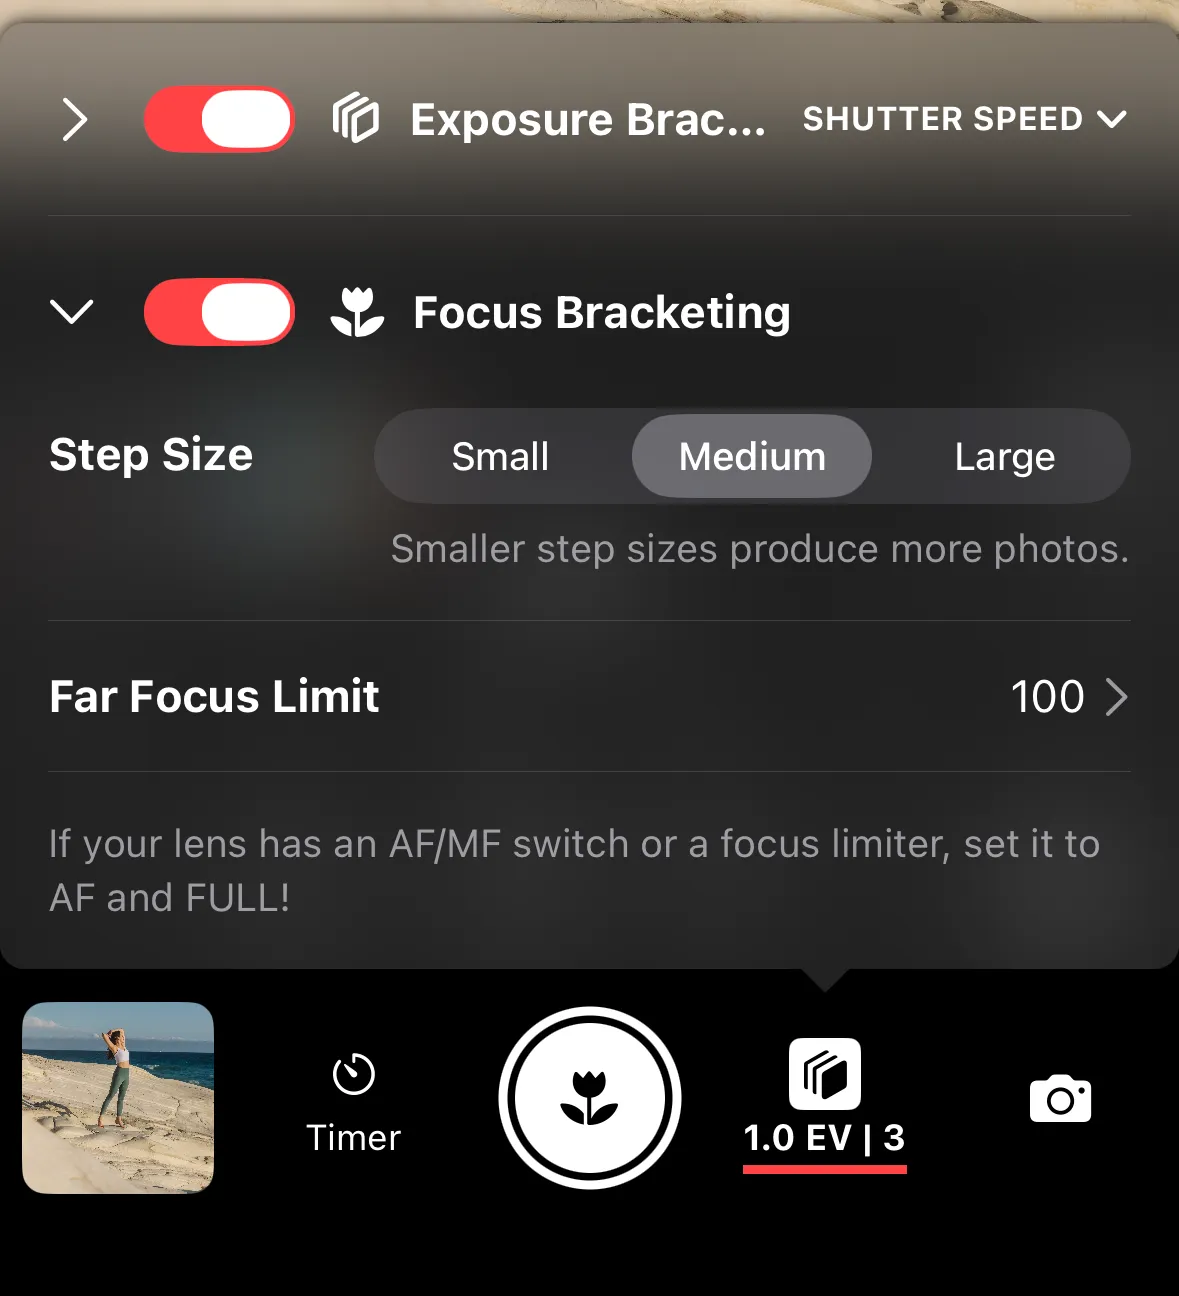
Shutter+ supports focus bracketing feature with Sony cameras and lenses. This is by far the quickest and most automated approach to focus stacking. Simply set the number of frames and the focus step interval, and the camera takes care of the rest — capturing a complete bracketed sequence without any manual intervention. If your camera supports it, this is the place to start.
Tap to focus for precise manual focus bracketing
For cameras that don’t support in-camera focus bracketing, or when you want full manual control over each focal point, Shutter+‘s tap to focus feature is the perfect solution. Simply tap anywhere on the live view image within the app to set your focal point precisely where you need it — whether that’s on a flower just centimetres from your lens, a mid-distance rock, or a church on a hillside far in the background. You can work your way methodically through the scene, frame by frame, placing focus exactly where you want it each time.
Zero camera movement between frames
The biggest enemy of a clean focus stack is movement between frames. Even the gentle act of pressing the shutter button on your camera or tapping the rear screen each time to focus can introduce enough vibration to misalign your frames and create artefacts in the final composite. Because Shutter+ lets you trigger the shutter, adjust focus, and control every aspect of the process entirely from your mobile device, you never need to touch the camera itself. The result is a perfectly consistent set of frames with no shift in position, making the blending process in Photoshop or Lightroom significantly cleaner and more accurate. The only unavoidable movement is that caused by the adjustments in focal distance, which is a natural result of the changes in lens magnification and field of view. This phenomenon is commonly known as focus breathing.
Control your aperture for the right depth of field per frame
Focus stacking isn’t just about where you focus — it’s also about how much depth of field each frame captures. With Shutter+ you have full control over aperture, shutter speed, and ISO directly from the app, so you can dial in the settings that give you the ideal overlap between focal planes. A slightly narrower aperture gives you more depth of field per frame, meaning fewer frames to capture and blend. A wider aperture gives you shallower slices, which can produce a more convincing final composite in scenes with complex foreground detail. Either way, you can adjust on the fly without ever going near the camera.
Preview every frame as you shoot
As you work through your focus stack, you can preview every frame directly in the Shutter+ app without needing to walk back to the camera. View thumbnails of each shot and expand any of them to full screen to check focus placement, exposure, and sharpness before moving on to the next focal point. If you’re using Shutter+ on an iPad, the larger screen makes this even more useful. Catching a missed frame on location is far better than discovering a gap in your stack back at the computer.
How to stack and blend in Photoshop or Lightroom
Once you’ve captured all your frames, transfer your photos to a computer. From there, it’s a straightforward process to bring them into Adobe Photoshop or Lightroom for stacking.
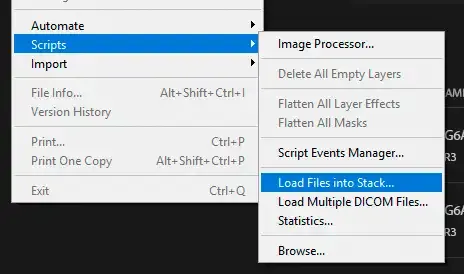
In Photoshop, load your frames as layers into a stack (File > Scripts > Load Files into Stack).
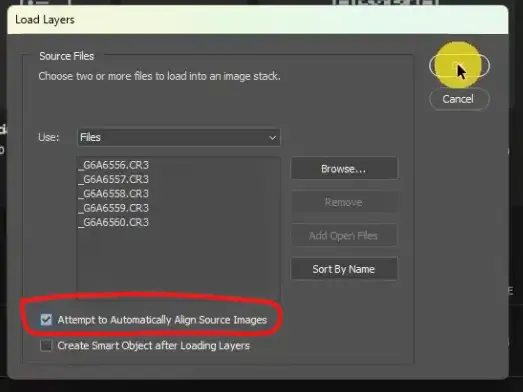
Select your photos, then tick “Attempt to Automatically Align Source Images.” This will correct the misalignment caused by the focus breathing.
Once all layers have been loaded, go to the layers palette, select all layers then choose Edit > Auto-Blend Layers. In the box, choose “stack images” and make sure to tick “Seamless Tones and Colors.”
Then sit back as Photoshop will intelligently blend the sharpest areas of each frame into a single image with front-to-back sharpness.
The cleaner and more consistent your original frames are, the better Photoshop’s automated blending performs. Frames captured with Shutter+, without any camera contact, give the algorithm as good a starting set as it’s possible to have.
See this in action on our video
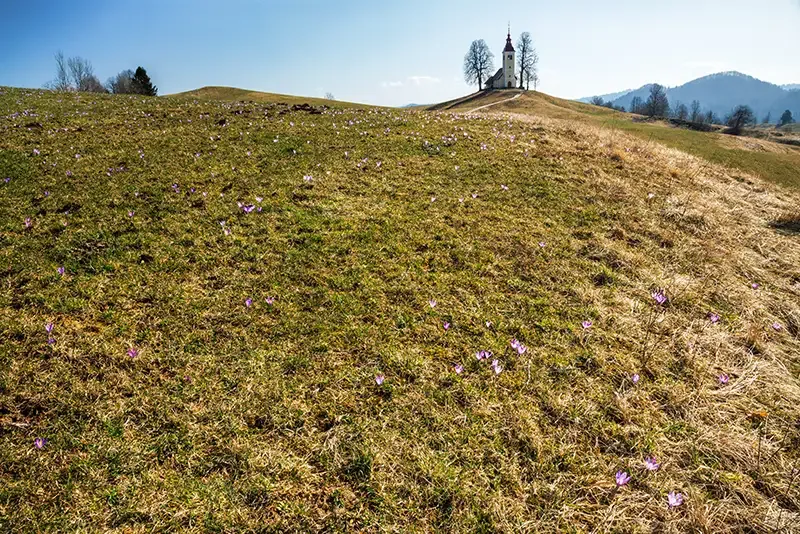
Watch our video using this very scene — Saint Thomas Church in Slovenia, with a carpet of purple crocuses in the foreground and the hilltop church in the far distance — to see just how easy focus stacking with Shutter+ can be. We show you how to use tap to focus to work through the scene step by step, and blending the frames in Photoshop to achieve front-to-back sharpness across the entire image.
Here are a few other things worth knowing about focus stacking
What is focus stacking and why do you need it?
Every camera lens has a limit to how much depth of field it can produce at any given aperture. In scenes with significant depth — a field of wildflowers stretching to a distant landmark, a macro subject with intricate near and far detail, or a landscape with compelling foreground interest — no single frame can keep everything sharp from front to back. Stopping down to a very small aperture (f/16 or beyond) can help, but introduces diffraction, which actually softens the overall image. Focus stacking solves this by combining multiple frames, each sharp at a different focal distance, into one composite image where everything appears in sharp focus simultaneously.
The technique is widely used in landscape photography, macro and nature photography, product photography, and architectural work — anywhere that depth of field limitations are getting in the way of the image you’re after.
Planning a focus stack on location
Before you start shooting, it pays to think through your focal planes. Look at the scene and identify the nearest point you want sharp, the furthest point, and how many distinct planes of interest lie between them. For a scene like a meadow with flowers a metre or two from the lens leading to a hillside church hundreds of metres away, you might need anywhere from three to six frames depending on your aperture and lens. Use Shutter+‘s live view to scan the scene and plan your focus points before you begin — this avoids gaps or unnecessary duplication in your stack and keeps the blending clean.
A sturdy tripod is essential. Even with zero camera shake during capture, any movement of the camera between frames caused by an unstable platform will introduce misalignment that Auto-Align Layers may struggle to correct fully, particularly at the edges of the frame.
In-camera focus bracketing vs. manual bracketing with tap to focus
Both approaches work well, but they suit different situations. In-camera focus bracketing is fast and largely automated — the camera steps through a predetermined number of focus increments and fires the shutter at each one. It’s excellent for relatively straightforward scenes where evenly spaced focal planes cover the depth you need. The limitation is that you have less control over exactly where each focal point lands, which can be a problem in scenes with very specific areas of interest. Additionally, if the camera shoots too fast after focusing it can introduce vibration, especially on longer lenses which are more sensitive to movement.
Manual focus bracketing using Shutter+‘s tap to focus gives you complete control. You place each focal point deliberately on the exact part of the scene you need sharp — the nearest crocus, the bend in the path, the church tower — and you can take as many or as few frames as the scene demands. You can also wait a while after focusing to allow any vibration caused by refocusing to settle down. It takes a little longer, but the results are precisely tailored to your subject, and because you’re working entirely via the app without touching the camera, the stability of your frame set is just as good as, if not better than, in-camera automation.
Learn more about Shutter+ for your camera
Visit the supported cameras list to confirm compatibility for Sony, Canon, and Fujifilm models, including whether your camera supports in-camera focus bracketing through the Shutter+ app.